目录

vue

目录

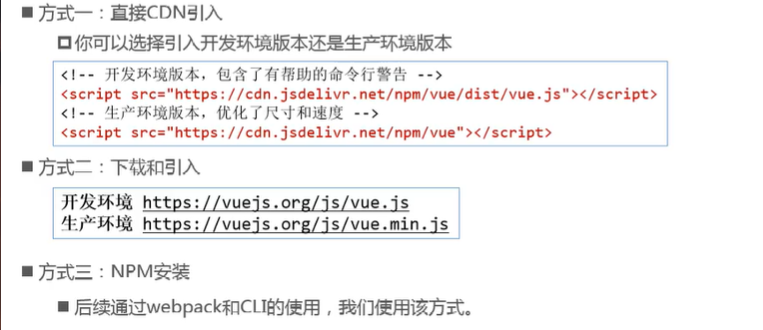
安装

https://raw.githubusercontent.com/yzuxqz/pic-bed/master/notes-img/vue%E5%AE%89%E8%A3%85.png

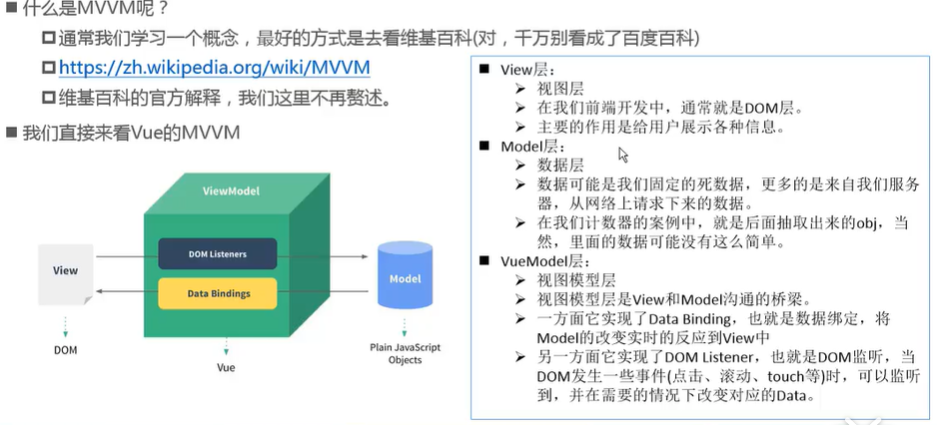
MVVM

https://raw.githubusercontent.com/yzuxqz/pic-bed/master/notes-img/MVVM.png

模板语法

Vue的基本使用

  1. 引入Vue.js库文件
  2. 使用vue语法处理数据
  3. 提供填充数据的标签
  4. 把vue提供的数据填充到标签中
 1
 2
 3
 4
 5
 6
 7
 8
 9
10
11
12
13
    <div id="app">
        <div> {{msg}} </div><!-- 插值表达式 -->
    </div>
    <!-- 2.引入库文件 -->
    <script type="text/javascript" src="js/vue.js"> </script>
    <script>
        var vm = new Vue({
            el: '#app',//元素挂载位置(可以是css选择器或者DOM元素)
            data: {//模型数据(值是一个对象)
                msg: 'Hello Vue'
            }
        });
    </script>

差值表达式

在mustache语法中,不仅仅可以直接写变量,也可以写简单的表达式

Mustache:{{}}

 1
 2
 3
 4
 5
 6
 7
 8
 9
10
11
12
13
14
15
16
17
18
19
20
<div id="app">
  <h2>{{message}}</h2>
  <h2>{{message}},xqz</h2>
<!--  在mustache语法中,不仅仅可以直接写变量,也可以写简单的表达式-->
  <h2>{{firstName+ ' ' +lastName}}</h2>
  <h2>{{firstName}} {{lastName}}</h2>
  <h2>{{counter * 2}}</h2>
</div>
<script src="../vue.js"></script>
<script>
  const app = new Vue({
    el: '#app',
    data: {
      message: 'hello',
      firstName: 'x',
      lastName: 'qz',
      counter:100
    }
  })
</script>

指令

  • 本质是自定义属性
  • 格式:v-开始

v-cloak

  • 作用:解决插值表达式存在闪动问题

  • 用法:

    1. 提供css样式

      [v-cloak]{diaplay=none}//属性选择器

    2. 在插值表达式所在的标签中添加v-cloak指令

  • 原理:先通过样式隐藏内容,然后再内存中进行值的替换,替换好之后再显示最终的结果

 1
 2
 3
 4
 5
 6
 7
 8
 9
10
11
12
13
14
15
16
17
18
19
<style>
  [v-cloak]{
    display: none;
  }
</style>
<body>
<!--在vue解析之前,div中有一个属性叫v-cloak,在解析之后会把这个属性删除-->
<div id="app" v-cloak>
  <h2>{{message}}</h2>
</div>
<script src="../vue.js"></script>
<script>
  const app = new Vue({
    el: '#app',
    data: {
      message: 'hello'
    }
  })
</script>

数据绑定

数据响应式
  • 概念:数据的变化导致页面内容的变化,vue会监听属性的变化
数据绑定
  • 将标签的内容与数据绑定

  • 将数据填充到标签中

v-once
  • 作用:编译一次,显示内容之后不再具有响应式功能
  • 应用场景:如果显示的信息后续不需要再修改,可以提高性能
v-text
  • 作用:填充纯文本
  • 区别:没有闪动问题
v-html
  • 作用:填充HTML片段,能解析html标签
  • 区别:存在安全问题,所以只能使用本网站的数据
v-pre
  • 作用:填充原始信息
  • 区别:能跳过编译过程
 1
 2
 3
 4
 5
 6
 7
 8
 9
10
11
12
13
14
15
16
17
18
<body>
    <div id="app">
        <div v-once></div>
        <div v-text="msg"></div>
        <div v-html="msg1"></div>
        <div v-pre>{{msg}}</div>
    </div>
    <script src="js/vue.js"></script>
    <script>
        var vm = new Vue({
            el: '#app',
            data: {
                msg: 'Hello',
                msg1:'<h1>HTML</h1>'
            }
        })
    </script>
</body>
双向数据绑定
  • MVVM设计思想(model数据-view模板视图-View-Model控制逻辑(Vue))

    • DOM Listener影响数据(事件监听)
    • Data Bindings影响视图(数据绑定)
  • v-model

    • 表单的变化引起数据的变化,视图中与之相关联的数据会重新渲染
 1
 2
 3
 4
 5
 6
 7
 8
 9
10
11
12
13
14
15
16
17
<body>
    <div id="app">
        <div>{{msg}}</div>
        <div>
            <input type="text" v-model="msg">
        </div>
    </div>
    <script src="../js/vue.js"></script>
    <script>
        var vm = new Vue({
            el: '#app',
            data: {
                msg: 'Hello'
            }
        })
    </script>
</body>
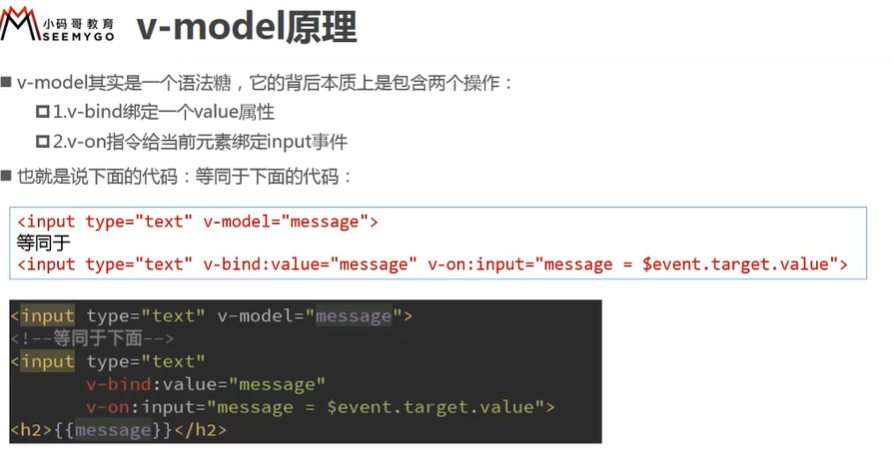
  • v-model本质原理

    https://raw.githubusercontent.com/yzuxqz/pic-bed/master/notes-img/v-model%E5%8E%9F%E7%90%86.png

     1
     2
     3
     4
     5
     6
     7
     8
     9
    10
    11
    12
    13
    14
    15
    16
    17
    18
    19
    20
    21
    22
    
    <body>
        <div id="app">
            <!-- 一个属性绑定把data对象的数据显示在页面上,一个事件函数把修改的值覆盖data对象中的原数据 -->
            <input type="text" :value="msg" @input='handle'>
            或者
            <input type="text" :value="msg" @input='msg=$event.target.value'>
            <span v-text='msg'></span>
        </div>
        <script src="../js/vue.js"></script>
        <script>
            var vm = new Vue({
                el: '#app',
                data: {
                    msg: 'hello',
                },
                methods: {
                    handle: function (event) {
                        this.msg = event.target.value;
                    }
                },
            })
        </script>
    
```

事件绑定

v-on:||@
 1
 2
 3
 4
 5
 6
 7
 8
 9
10
11
12
13
14
15
16
17
18
19
20
<body>
    <div id="app">
        <div>{{num}}</div>
        <button @click='handle()'>点击</button>
    </div>
    <script src="../js/vue.js"></script>
    <script>
        var vm = new Vue({
            el: '#app',
            data: {
                num: 0
            },
            methods: {
                handle: function () {
                    this.num++;//this指vm指的是vue的实例
                }
            }
        })
    </script>
</body>
事件函数参数绑定
  1. 如果事件直接绑定函数名称不传参(==不写括号==),那么默认会传递事件对象做为事件函数的第一个参数

  2. 如果传的是变量,会去data属性里找,没有则报错

  3. 如果事件绑定函数传参,那么事件函数作为最后一个参数,以$event形式进行显示传递

     1
     2
     3
     4
     5
     6
     7
     8
     9
    10
    11
    12
    13
    14
    15
    16
    17
    18
    19
    20
    21
    22
    23
    24
    25
    26
    
    <body>
        <div id="app">
            <div>{{num}}</div>
            <button @click='handle(123,456,$event)'>点击1</button>
            <button @click='handle2'>点击2</button>
        </div>
        <script src="../js/vue.js"></script>
        <script>
            var vm = new Vue({
                el: '#app',
                data: {
                    num: 0
                },
                methods: {
                    handle: function (p1, p2, event) {
                        this.num++; //this指vm指的是vue的实例
                        console.log(p1, p2);
                        console.log(event.target.innerHTML);     
                    },
                    handle2: function (event) {
                        console.log(event.target.innerHTML);
                    }
                }
            })
        </script>
    </body>
    
事件修饰符
  • 阻止冒泡

    @click.stop=‘函数名’

  • 组织默认行为

    @click.prevent=‘函数名’

    注意:阻止a标签的默认行为:@click.prevent不用添加函数direv

按键修饰符
  • enter触发

    @keyup.enter=‘函数名’

  • delete触发

    @keyup.delete=‘函数名’

  • 自定义按键触发

    Vue.config.keyCodes.a=65;

  • once

    点击第一次有反应

属性绑定

将==标签的属性==和数据绑定

  • v-bind:属性名||:属性名

     1
     2
     3
     4
     5
     6
     7
     8
     9
    10
    11
    12
    13
    14
    15
    16
    17
    18
    19
    20
    21
    
    <body>
        <div id="app">
            <a v-bind:href="url">百度</a>
            <button @click='handle'>切换</button>
        </div>
        <script src="../js/vue.js"></script>
        <script>
            var vm = new Vue({
                el: '#app',
                data: {
                    url: 'http://www.baidu.com',
                },
                methods: {
                    handle: function () {
                        //修改url地址
                        this.url = 'http://itcast.cn';
                    }
                },
            })
        </script>
    </body>
    

样式绑定

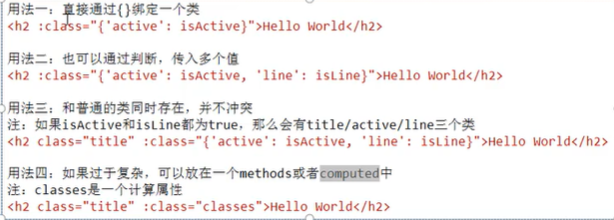
class样式处理

https://raw.githubusercontent.com/yzuxqz/pic-bed/master/notes-img/v-bind%E7%BB%91%E5%AE%9Aclass.png

  • 对象语法

    css的class属性名:属性值(data对象中的属性名)值为true或false

     1
     2
     3
     4
     5
     6
     7
     8
     9
    10
    11
    12
    13
    14
    15
    16
    17
    18
    19
    20
    21
    22
    23
    
    <body>
        <div id="app">
            <div v-bind:class="{active: isActive,error:isError}">测试</div>
            <button @click='handle'>切换</button>
        </div>
        <script src="../js/vue.js"></script>
        <script>
            var vm = new Vue({
                el: '#app',
                data: {
                    isActive: true,
                    isError: true,
                },
                methods: {
                    handle: function () {
                        //控制active
                        this.isActive = !this.isActive;
                        this.isError = !this.isError;
                    }
                },
            })
        </script>
    </body>
    
  • 数组语法

    data对象中的属性名 属性值为css的class属性名

     1
     2
     3
     4
     5
     6
     7
     8
     9
    10
    11
    12
    13
    14
    15
    16
    17
    18
    19
    20
    21
    22
    
    <body>
        <div id="app">
            <div v-bind:class='[activeClass,errorClass]'></div>
            <button :click='handle'>切换</button>
        </div>
        <script src="../js/vue.js"></script>
        <script>
            var vm = new Vue({
                el: '#app',
                data: {
                    activeClass: 'active',
                    errorClass: 'error'
                },
                methods: {
                    handle: function () {
                        this.activeClass = '';
                        this.errorClass = '';
                    }
                },
            })
        </script>
    </body>
    
  • 对象和数据语法结合与简化

    提高可读性

    ==注意==:默认的class会保留

     1
     2
     3
     4
     5
     6
     7
     8
     9
    10
    11
    12
    13
    14
    15
    16
    17
    18
    19
    20
    21
    22
    23
    24
    25
    26
    27
    28
    
    <body>
        <div id="app">
            <div v-bind:class='[arrClasses,{test:isTest}]'>数组和对象的结合</div>//结合使用
            <div :class='objClasses'></div>//使用对象
            <button @click='handle'>切换</button>
        </div>
        <script src="../js/vue.js"></script>
        <script>
            var vm = new Vue({
                el: '#app',
                data: {
                    isTest: true,
                    arrClasses: ['active', 'error'],//简化数组
                    objClasses: {//简化对象
                        active: true,
                        error: true,
                    }
                },
                methods: {
                    handle: function () {
                        this.arrClasses.pop();
                        this.objClasses.error = false;
                        this.isTest = !this.isTest;
                    }
                },
            })
        </script>
    </body>
    
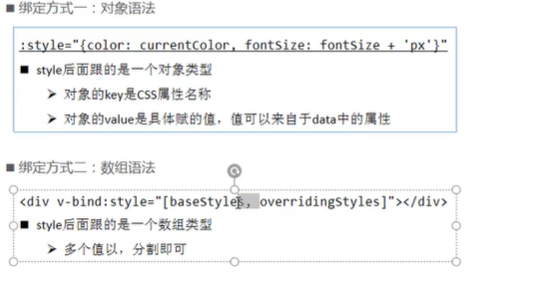
style样式处理

https://raw.githubusercontent.com/yzuxqz/pic-bed/master/notes-img/v-bind%E7%BB%91%E5%AE%9Astyle.png

  • ​ 对象语法

     1
     2
     3
     4
     5
     6
     7
     8
     9
    10
    11
    12
    13
    14
    15
    16
    17
    18
    19
    20
    21
    22
    23
    24
    25
    26
    27
    28
    29
    30
    31
    32
    33
    
    <body>
        <div id="app">
            <div v-bind:style='{border:borderStyle,width:widthStyle,height:heightStyle}'></div>
            <div v-bind:style='objStyles'></div>
            <button @click='handle'>切换</button>
        </div>
        <script src="../js/vue.js"></script>
        <script>
            var vm = new Vue({
                el: '#app',
                data: {
                    borderStyle: '1px solid red',
                    widthStyle: '100px',
                    heightStyle: '200px',
                    objStyles: {						//简化形式对象1
                        border: '1px solid green',
                        width: '200px',
                        height: '100px'
                    },
                    overrideStyles: {					//对象2
                        border: '5px solid orange',
                        backgroundColor: 'blue',
                    }
                },
                methods: {
                    handle: function () {
                        this.heightStyle = '100px';
                        this.objStyles.width = '100px';
                    }
                },
            })
        </script>
    </body>
    
  • 数组语法

    ​ 数组元素是多个对象,覆盖关系

    1
    
     <div v-bind:style='[objStyles,overrideStyles]'></div>
    

分支循环结构

分支结构
  • v-if

  • v-else

  • v-else-if

  • v-show:切换显示与否的频率非常高的时候使用,可以提升效率

    原理:控制display是none还是block

  • ==注意==:v-if控制元素是否渲染到页面(dom元素的增加或删除)

    ​ v-show控制元素是否显示(已经渲染到了页面,只是样式的显示与否)

     1
     2
     3
     4
     5
     6
     7
     8
     9
    10
    11
    12
    13
    14
    15
    16
    17
    18
    19
    20
    21
    22
    23
    24
    25
    26
    
    <body>
        <div id="app">
            <div v-if='score>=90'>优秀</div>
            <div v-else-if='score<90&&score>=80'>良好</div>
            <div v-else-if='score<80&&score>=60'>一般</div>
            <div v-else>比较差</div>
    
            <div v-show='flag'>测试v-show</div>
            <button @click='handle'>点击显示</button>
        </div>
        <script src="../js/vue.js"></script>
        <script>
            var vm = new Vue({
                el: '#app',
                data: {
                    score: 99,
                    flag: false
                },
                methods: {
                    handle: function () {
                        this.flag = !this.flag;
                    }
                },
            })
        </script>
    </body>
    
循环结构
  • v-for遍历数组

    • 遍历数组元素

    • {{item}}
    • 遍历元素和索引

    • {{item + '-----' + index}}
 1
 2
 3
 4
 5
 6
 7
 8
 9
10
11
12
13
14
15
16
17
18
19
20
21
22
23
24
25
26
27
28
29
30
31
32
33
34
35
36
37
<body>
    <div id="app">
<div>水果列表</div>
<ul>
    <li v-for='item in fruits'>{{item}}</li>
    <li v-for='(item,index) in fruits'>{{item+'------'+index}}</li>
    <li v-for='(item,index) in myfruits'>
        <span>{{item.cname+'------'+index}}</span>
        <span>{{item.ename+'------'+index}}</span>
    </li>
</ul>
    </div>
    <script src="../js/vue.js"></script>
    <script>
        var vm = new Vue({
            el: '#app',
            data: {
                fruits: ['apple', 'orange', 'banana'],
                myfruits:[{
                    ename:'apple',
                    cname:'苹果'
                },
                {
                    ename:'orange',
                    cname:'橘子'
                },
                {
                    ename:'banana',
                    cname:'香蕉'
                },]
            },
            methods: {

            },
        })
    </script>
</body>
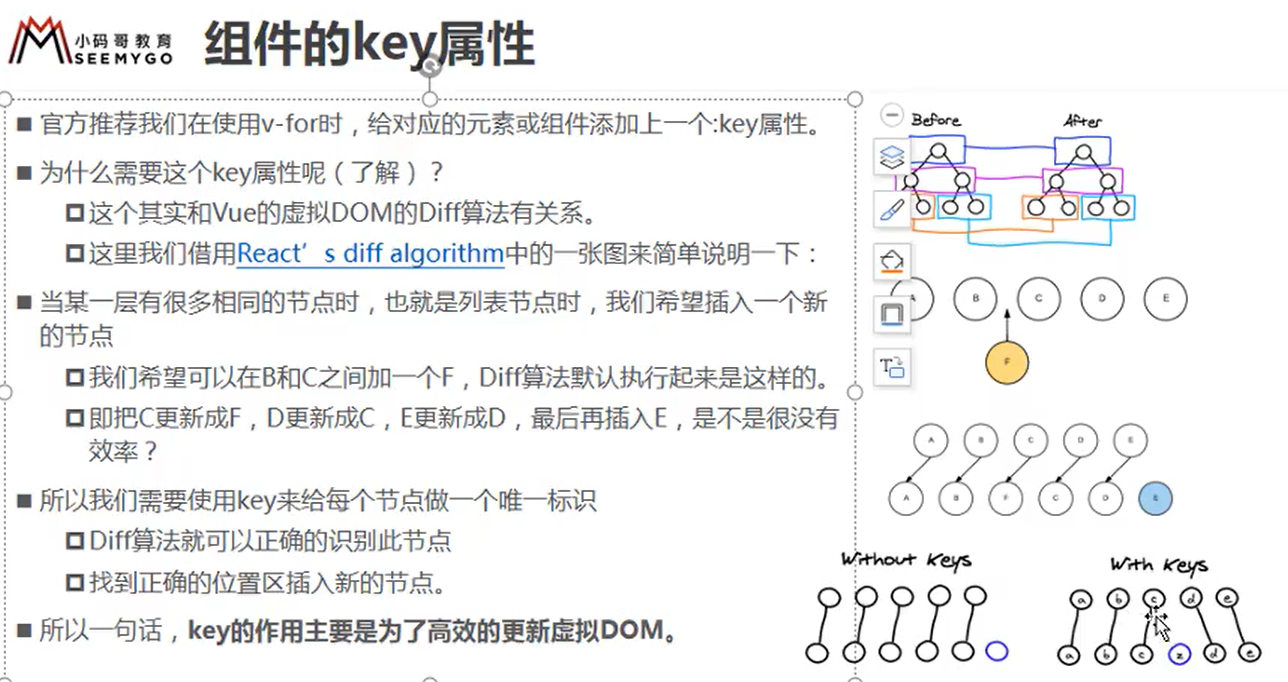
  • key的作用

    https://raw.githubusercontent.com/yzuxqz/pic-bed/master/notes-img/key%E7%BB%84%E4%BB%B6%E5%B1%9E%E6%80%A7.png

    1. 帮助vue区分不同元素,可以提高性能
    2. 如果两个key不一样,能够让vue的虚拟dom不去复用原来的元素,如果key是用的item,那么需要保证item的唯一性
     1
     2
     3
     4
     5
     6
     7
     8
     9
    10
    11
    12
    13
    14
    15
    16
    17
    18
    19
    20
    21
    22
    23
    24
    25
    26
    
    <div id="app">
      <span v-if="isUser">
        <label for="username">用户账号</label>
        <input type="text" id="username" placeholder="用户账号" key="username">
    
      </span>
      <span v-else>
            <label for="email">用户邮箱</label>
        <input type="text" id="email" placeholder="用户邮箱" key="email">
      </span>
      <button @click="change">切换类型</button>
    </div>
    <script src="../../vue.js"></script>
    <script>
      const app = new Vue({
        el: '#app',
        data: {
          isUser: true
        },
        methods: {
          change() {
            this.isUser = !this.isUser
          }
        }
      })
    </script>
    
    1
    
    <li :key='item.id' v-for='item in fruits'>{{item}}</li>//没有提供id,则用key=‘index’,唯一的就可以
    
  • v-for遍历对象

    1
    
    <div v-for='(value,key,index) in obj'>{{key + '-----' + value + '-----' + index}}</div>
    
  • v-if和v-for结合使用

    1
    
    <div v-if='obj["age"] > 10 ' v-for='(value,key,index) in obj'>{{key + '-----' + value + '-----' + index}}</div>
    

Vue常用特性

表单操作

基于Vue的表单操作

  • input

    双向数据绑定

    值绑定

     1
     2
     3
     4
     5
     6
     7
     8
     9
    10
    11
    12
    13
    14
    15
    16
    17
    18
    19
    20
    21
    22
    23
    24
    25
    26
    27
    28
    29
    30
    31
    32
    
    <!DOCTYPE html>
    <html lang="en">
    <head>
      <meta charset="UTF-8">
      <title>Title</title>
    </head>
    <body>
    <div id="app">
      <!--  checkbox多选框-->
    <!--  <input type="checkbox" value="篮球" v-model="hobbies">篮球-->
    <!--  <input type="checkbox" value="足球" v-model="hobbies">足球-->
    <!--  <input type="checkbox" value="乒乓球" v-model="hobbies">乒乓球-->
    <!--  <input type="checkbox" value="羽毛球" v-model="hobbies">羽毛球-->
      <h2>宁的爱好是{{hobbies}}</h2>
      <label v-for="item in arguments" :for="item">
        <input type="checkbox" :value="item" v-model="hobbies" :id="item">{{item}}
      </label>
    </div>
    <script src="../vue.js"></script>
    <script>
      const app = new Vue({
        el: '#app',
        data: {
          message: 'hello',
          isAgree: false,
          hobbies: [],
          arguments:['篮球','足球','羽毛球']
        }
      })
    </script>
    </body>
    </html>
    
  • textarea

    双向数据绑定

  • select

    给option value值,select双向数据绑定

     1
     2
     3
     4
     5
     6
     7
     8
     9
    10
    11
    12
    13
    14
    15
    16
    17
    18
    19
    20
    21
    22
    23
    24
    25
    26
    27
    
    <!DOCTYPE html>
    <html lang="en">
    <head>
      <meta charset="UTF-8">
      <title>Title</title>
    </head>
    <body>
    <div id="app">
      <select name="choose" id="" v-model="fruit" multiple>
        <option value="苹果" >苹果</option>
        <option value="香蕉" >香蕉</option>
        <option value="榴莲" >榴莲</option>
      </select>
      <h2>{{fruit}}</h2>
    </div>
    <script src="../vue.js"></script>
    <script>
      const app = new Vue({
        el: '#app',
        data: {
          message: 'hello',
          fruit:[]
        }
      })
    </script>
    </body>
    </html>
    
  • radio

    给表单value值,双向数据绑定

     1
     2
     3
     4
     5
     6
     7
     8
     9
    10
    11
    12
    13
    14
    15
    16
    17
    18
    19
    20
    21
    22
    23
    24
    25
    26
    
    <!DOCTYPE html>
    <html lang="en">
    <head>
      <meta charset="UTF-8">
      <title>Title</title>
    </head>
    <body>
    <div id="app">
      <label for="male"></label>
      <input type="radio" id="male"  value="男" v-model="sex">
      <label for="female"></label>
      <input type="radio" id="female"  value="女" v-model="sex">
      <h2>{{sex}}</h2>
    </div>
    <script src="../vue.js"></script>
    <script>
      const app = new Vue({
        el: '#app',
        data: {
          message: 'hello',
          sex:'男'
        }
      })
    </script>
    </body>
    </html>
    

    ==注意==:

    1. 当绑定了同一个v-model时,可以把name省略,这样也是互斥的(单选)
  • checkbox

     1
     2
     3
     4
     5
     6
     7
     8
     9
    10
    11
    12
    13
    14
    15
    16
    17
    18
    19
    20
    21
    22
    23
    24
    25
    26
    27
    28
    29
    30
    31
    32
    33
    34
    
    <!DOCTYPE html>
    <html lang="en">
    <head>
      <meta charset="UTF-8">
      <title>Title</title>
    </head>
    <body>
    <div id="app">
      <!--  checkbox单选框-->
      <!--  <label for="agree">同意</label>-->
      <!--  <input type="checkbox" id="agree" v-model="isAgree">-->
      <!--  <button :disabled="!isAgree">下一步</button>-->
      <!--  <h2>{{isAgree}}</h2>-->
    
      <!--  checkbox多选框-->
      <input type="checkbox" value="篮球" v-model="hobbies">篮球
      <input type="checkbox" value="足球" v-model="hobbies">足球
      <input type="checkbox" value="乒乓球" v-model="hobbies">乒乓球
      <input type="checkbox" value="羽毛球" v-model="hobbies">羽毛球
      <h2>宁的爱好是{{hobbies}}</h2>
    </div>
    <script src="../vue.js"></script>
    <script>
      const app = new Vue({
        el: '#app',
        data: {
          message: 'hello',
          isAgree: false,
          hobbies: []
        }
      })
    </script>
    </body>
    </html>
    

    给表单value值,双向数据绑定

  • 注意:提交按钮submit取消默认行为,增加点击事件用ajax传递数据

     1
     2
     3
     4
     5
     6
     7
     8
     9
    10
    11
    12
    13
    14
    15
    16
    17
    18
    19
    20
    21
    22
    23
    24
    25
    26
    27
    28
    29
    30
    31
    32
    33
    34
    35
    36
    37
    38
    39
    40
    41
    42
    43
    44
    45
    46
    47
    48
    49
    50
    51
    52
    53
    54
    55
    56
    57
    58
    59
    60
    61
    62
    63
    64
    65
    66
    
    <body>
        <div id="app">
            <form action="http://itcast.cn">
                <div>
                    <label for="name">姓名:</label>
                    <input type="text" id="name" v-model='uname'>
                </div>
    
                <div>
                    <span>性别:</span>
                    <label for="man" ></label>
                    <input type="radio" id="man" value="1" v-model='sex'>
                    <label for="woman" ></label>
                    <input type="radio" id="woman" value="2" v-model='sex'>
                </div>
    
                <div>
                    <span>爱好:</span>
                    <label for="basketball">篮球</label>
                    <input type="checkbox" id="basketball" value="1" v-model='hobbies'>
                    <label for="sing">唱歌</label>
                    <input type="checkbox" id="sing" value="2" v-model='hobbies'>
                    <label for="code">写代码</label>
                    <input type="checkbox" id="code" value="3" v-model='hobbies'>
                </div>
                <div>
                    <span>职业:</span>
                    <select name="" id="" v-model='occupation' multiple>
                        <option value="0">请选择职业...</option>
                        <option value="1">web前端</option>
                        <option value="2">java后端</option>
                    </select>
                </div>
                <div>
                    <label for="introduction">个人简介:</label>
                    <textarea name="" id="" cols="30" rows="3" v-model='description'></textarea>
                </div>
                <div>
                    <input type="submit" @click.prevent='handle'>
                </div>
            </form>
        </div>
        <script src="../js/vue.js"></script>
        <script>
            var vm = new Vue({
                el: '#app',
                data: {
                    uname: 'xqz',
                    sex:1,
                    hobbies:[1,2],
                    occupation:[1,2],
                    description:'你好'
                },methods: {
                    handle:function(){
                        console.log(this.uname);
                        console.log(this.sex);
                        console.log(this.hobbies.toString());
                        console.log(this.occupation.toString());
                        console.log(this.description);
    
                        //Ajax
                    }
                },
            })
        </script>
    </body>
    

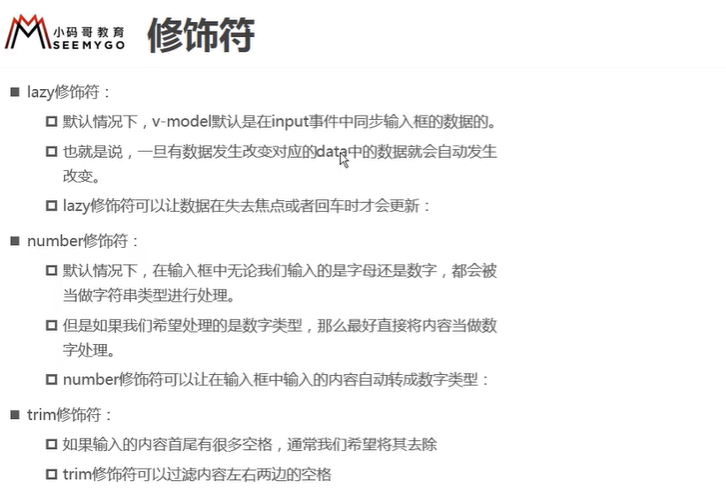
表单域修饰符

https://raw.githubusercontent.com/yzuxqz/pic-bed/master/notes-img/v-model%E4%BF%AE%E9%A5%B0%E7%AC%A6.png

  • v-model.number

    转为数值

  • trim

    去掉开始和结尾的空格,不会去掉中间的

  • lazy

    把双向绑定中的input事件切换为change事件,input是在输入时一直触发,change是在失去焦点时才更新数据

 1
 2
 3
 4
 5
 6
 7
 8
 9
10
11
12
13
14
15
16
17
18
19
20
21
22
23
24
25
26
<body>
    <div id="app">
        <input type="text" v-model.number='age'>
        <input type="text" v-model.trim='info'>
        <input type="text" v-model.lazy='msg'>
        <div>{{msg}}</div>
        <button @click='handle'>点击</button>
    </div>
    <script src="../js/vue.js"></script>
    <script>
        var vm = new Vue({
            el: '#app',
            data: {
                age: '',
                info:'',
                msg:''
            },
            methods: {
                handle: function () {
                    console.log(this.age + 1);
                    console.log(this.info.length);
                }
            },
        })
    </script>
</body>

自定义指令

基本使用

Vue.directive(‘指令的名字’,{

钩子函数

})

 1
 2
 3
 4
 5
 6
 7
 8
 9
10
11
12
13
14
15
16
17
18
19
20
21
22
23
24
25
26
<body>
    <div id="app">
        <input type="text">
        <input type="text" v-focus>
    </div>
    <script src="../js/vue.js"></script>
    <script>
        Vue.directive('focus', {
            inserted: function (el) {
                //el表示指令所绑定的元素
                el.focus();
            }
        })
        var vm = new Vue({
            el: '#app',
            data: {

            },
            methods: {
                handle: function () {

                }
            },
        })
    </script>
</body>

==注意==:focus()函数只在inserted中生效,而在bind中不生效

  • bind :指令第一次绑定到元素上时调用
  • inserted:表示元素在插入到DOM中的时候,会执行inserted函数,只执行一次
  • update :VNode更新的时候调用,可能会调用多次

页面上的任何一个元素想要显示,首先需要浏览器的渲染引擎将元素加载到内存中形成DOM树,也就是说执行bind函数的时候,元素还没有插入到内存中去,因为,一个元素只有插入DOM之后,才会获得焦点。所以说,在bind函数中执行el.focus()焦点事件的时机是不对的;同理可得,==凡是与js样式有关的需在bind函数中执行(如:el.style.color = 'blue'),而与js行为有关的,需在inserted函数中执行==

带参数的自定义指令

binding获取指令的参数值

 1
 2
 3
 4
 5
 6
 7
 8
 9
10
11
12
13
14
15
16
17
18
19
20
21
22
23
<body>
    <div id="app">
        <input type="text" v-color='msg'>
    </div>
    <script src="../js/vue.js"></script>
    <script>
        Vue.directive('color',{
            bind:function (el,binding) {
                //根据指令的参数修改背景色
                el.style.backgroundColor = binding.value.color;
                console.log(binding.value.color);
              }
        });
        var vm=new Vue({
            el:'#app',
            data:{
                msg:{
                    color:'orange'
                }
            }
        })
    </script>
</body>

局部指令

  • 在Vue的实例中添加额外的属性directive

  • 只能在本组件中使用

 1
 2
 3
 4
 5
 6
 7
 8
 9
10
11
12
13
14
15
16
17
18
19
20
21
22
23
24
25
26
27
28
29
30
31
32
33
<body>
    <div id="app">
        <input type="text" v-color='msg' v-focus>
    </div>
    <script src="../js/vue.js"></script>
    <script>
        var vm = new Vue({
            el: '#app',
            data: {
                msg: {
                    color: 'blue'
                }
            },
            methods: {
                handle: function () {
                }
            },
     
            directives: {
                color: {
                    bind: function (el, binding) {
                        el.style.backgroundColor = binding.value.color;
                    }
                },
                focus: {
                    inserted: function (el) {
                        el.focus();
                    }
                }
            }
        })
    </script>
</body>

计算属性

  • 表达式的计算逻辑可能会比较复杂,使用计算属性可以使模板内容更加简洁

  • 在Vue实例中添加computed属性,直接在插值表达式中调用函数名

  • ==注意==:计算属性的数据是基于data的,data变化会引起计算属性的变化

1
2
3
4
5
 computed: {
                reserveString:function(){
                    return this.msg.split('').reverse().join('');
                }
            },

==计算属性和方法的区别==

  • 计算属性是基于他们的依赖进行缓存的,如果依赖不变则使用的是缓存的结果,依赖变化才重新计算
  • 方法不存在缓存

==注意==:

  1. 计算属性也有set和get方法,因为一般不使用set方法所以会将set方法省略,直接写get方法

过滤器

  • 作用:格式化数据,比如将字符串格式化为首字母大写,将日期格式化为指定格式

  • 自定义过滤器:

    1
    2
    3
    4
    5
    
    Vue.filter{
    "过滤器名称"function(value){
    //业务逻辑
    	}
    }
    
  • 过滤器使用

    • 全局和局部,级联使用
     1
     2
     3
     4
     5
     6
     7
     8
     9
    10
    11
    12
    13
    14
    15
    16
    17
    18
    19
    20
    21
    22
    23
    24
    25
    26
    27
    28
    29
    
    <body>
        <div id="app">
            <input type="text" v-model='msg'>
            <div>{{msg | upper}}</div>
            <div>{{msg | upper | lower}}</div>
            <div :abc='msg | upper'>测试数据</div>
        </div>
        <script src="../js/vue.js"></script>
        <script>
            // Vue.filter('upper', function (val) {
            //     return val.charAt(0).toUpperCase() + val.slice(1);
            // });
            Vue.filter('lower', function (val) {
                return val.charAt(0).toLowerCase() + val.slice(1);
            })
            var vm = new Vue({
                el: '#app',
                data: {
                    msg: '',
                },
                // 局部过滤器
                filters: {
                    upper: function (val) {
                        return val.charAt(0).toUpperCase() + val.slice(1);
                    }
                }
            })
        </script>
    </body>
    
  • 带参数的过滤器

     1
     2
     3
     4
     5
     6
     7
     8
     9
    10
    11
    12
    13
    14
    15
    16
    17
    18
    19
    20
    21
    
    <body>
        <div id="app">
            <div>{{date | format('yyyy-MM-dd')}}</div>
        </div>
        <script src="../js/vue.js"></script>
        <script>
            Vue.filter('format', function (value, arg) {
                if (arg == 'yyyy-MM-dd') {
                    var ret = '';
                    ret += value.getFullYear() + '-' + value.getMonth() + '-' + value.getDate();
                    return ret;
                }         
            })
            var vm = new Vue({
                el: '#app',
                data: {
                    date: new Date(),
                },
            })
        </script>
    </body>
    

侦听器

  • 应用场景:数据变化时执行异步或开销较大的操作

  • 数据一旦发生变化就通知侦听器所绑定的方法

  • 一般用于监听v-model绑定的数据

  • 用法:

    1
    2
    3
    4
    5
    6
    7
    8
    
     watch: {		//函数名和属性名一致,这样才知道监听的哪个属性
                    firstName: function (val) { //val表示的是当前数据的最新值
                        this.fullName = val + '' + this.lastName;
                    },
                    lastName: function (val) {
                        this.fullName = this.firstName + '' + val;
                    }
                },
    

生命周期

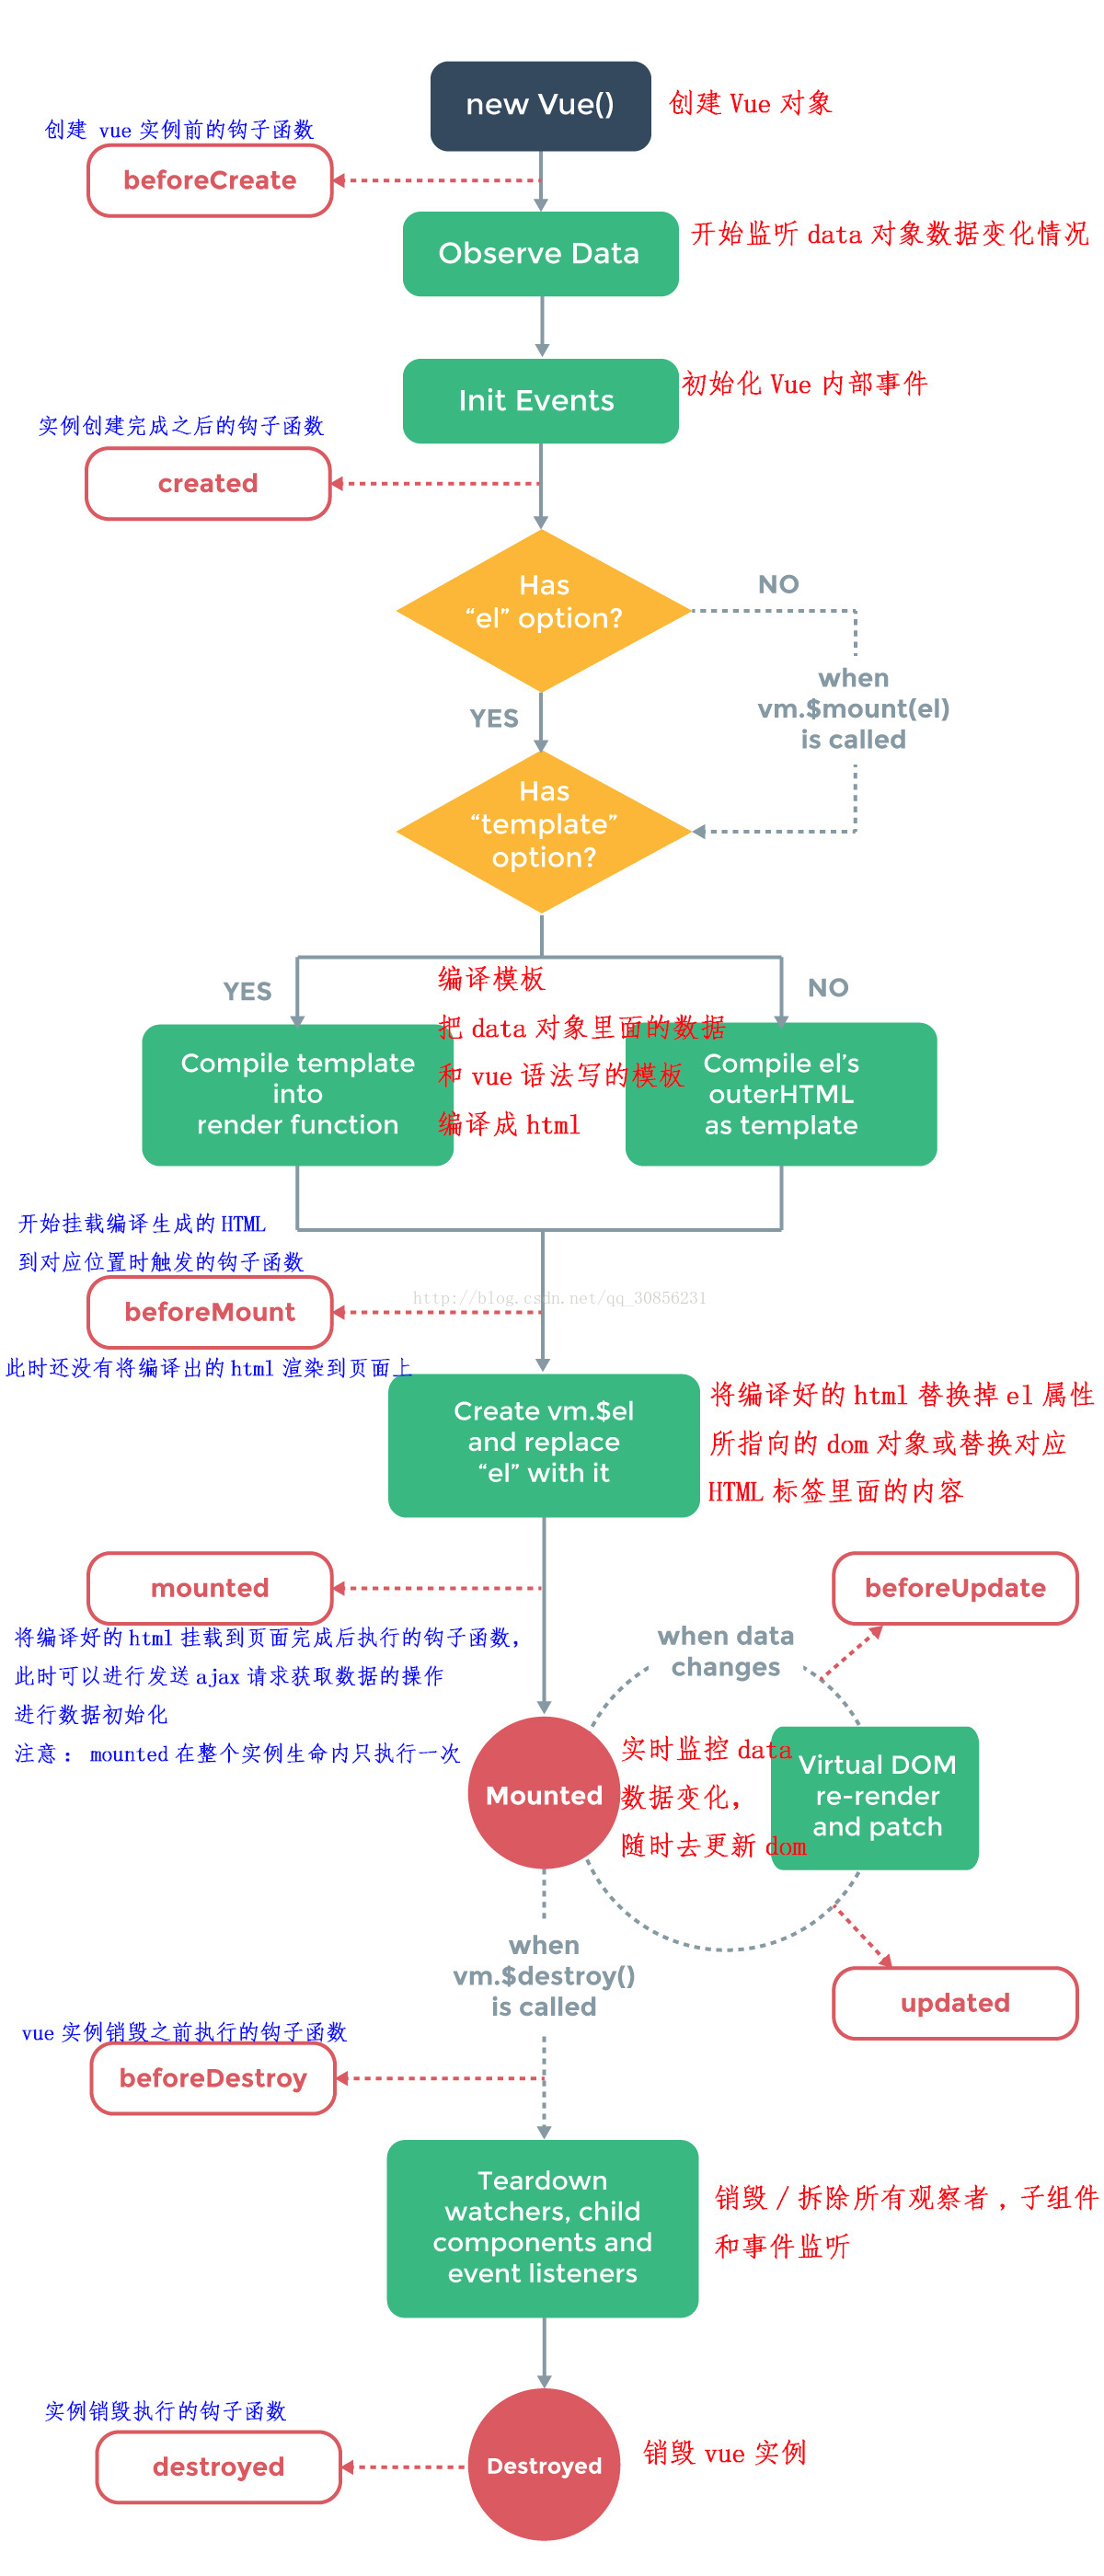
https://raw.githubusercontent.com/yzuxqz/pic-bed/master/notes-img/Vue%E7%94%9F%E5%91%BD%E5%91%A8%E6%9C%9F.png

  • 挂载(初始化相关属性)

    • beforeCreate:在实例初始化后,数据观测和事件配置之前被调用

    • created:在实例创建完成后立即被调用

    • beforeMount:在挂载开始之前被调用

    • mounted:el被新创建的vm.$el替换,并挂载到实例上去之后调用该钩子

      注意:当这个函数调用代表初始化完成,页面中模板内容存在,可以填充数据

  • 更新(元素或组件的变更操作)

    • beforeUpdate:数据更新时调用,发生在虚拟DOM打补丁之前
    • ubdated:由于数据更改导致的虚拟DOM重新渲染和打补丁,在这之后会调用该钩子
  • 销毁(销毁相关属性)

    • beforeDestroy:实例销毁之前调用
    • destroyed:实例销毁之后调用

数组相关API

变异方法(修改原有数组)

作用:使得数组数据也具有响应式的特性

  • push()
  • pop()
  • shift()
  • unshift()
  • splice()
  • sort()
  • reverse()

替换数组(生成新的数组)

==注意==:需要赋值给原始的数组

  • filter()
  • concat()
  • slice()

数组索引 || 对象属性

直接使用数组索引的方法没有响应式的特性,所以Vue提供以下Api

Vue.set(vm.items,indexOfitem,newValue) || vm.$set(vm.items,indexOfitem,newValue)

  1. 参数一表示要处理的数组名称
  2. 参数二表示要处理的数字索引
  3. 参数三表示要处理的数组的值
 1
 2
 3
 4
 5
 6
 7
 8
 9
10
11
12
13
14
15
16
17
18
19
20
21
22
23
24
25
26
27
28
29
30
31
32
33
34
35
36
37
38
39
40
41
42
43
44
45
46
47
48
49
50
51
<body>
    <div id="app">
        <div>
            <span>
                <input type="text" v-model='fname'>
                <button @click='add'>添加</button>
                <button @click='del'>删除</button>
                <button @click='change'>替换</button>
            </span>
        </div>
        <ul>
            <li :key='index' v-for='(item,index) in list'>{{item}}</li>
        </ul>
        <div>{{info.name}}</div>
        <div>{{info.age}}</div>
        <div>{{info.gender}}</div>
    </div>
    <script src="../../js/vue.js"></script>
    <script>
        var vm = new Vue({
            el: '#app',
            data: {
                fname: '',
                list: ['apple', 'orange', 'banana'],
                info: {
                    name: 'lisi',
                    age: 12
                }
            },
            //数组api
            methods: {
                add: function () {
                    this.list.push(this.fname);
                },
                del: function () {
                    this.list.pop();
                },
                change: function () {
                    this.list = this.list.slice(0, 2);
                }
            },
        })
        //数组索引
        Vue.set(vm.list, 1, 'lemon');
        vm.$set(vm.list, 2, 'lemon2')

        //对象属性
        //vm.info.gender='male';//只能显示,不能获取修改的
        vm.$set(vm.info, 'gender', 'female');
    </script>
</body>

组件化开发

组件化开发思想

Web Components通过创建封装好功能的定制元素解决组件化规范问题

提供的组件

  • component

    根据绑定的is属性来显示组件

    1
    
    <component :is="'keji'"></component>//显示自定义的keji组件
    

组件注册

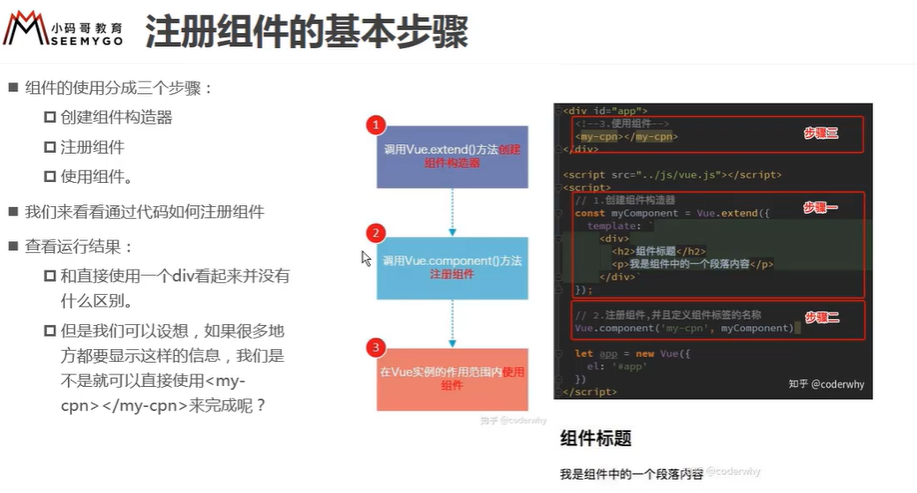
https://raw.githubusercontent.com/yzuxqz/pic-bed/master/notes-img/%E6%B3%A8%E5%86%8C%E7%BB%84%E4%BB%B6%E7%9A%84%E5%9F%BA%E6%9C%AC%E6%AD%A5%E9%AA%A4.png

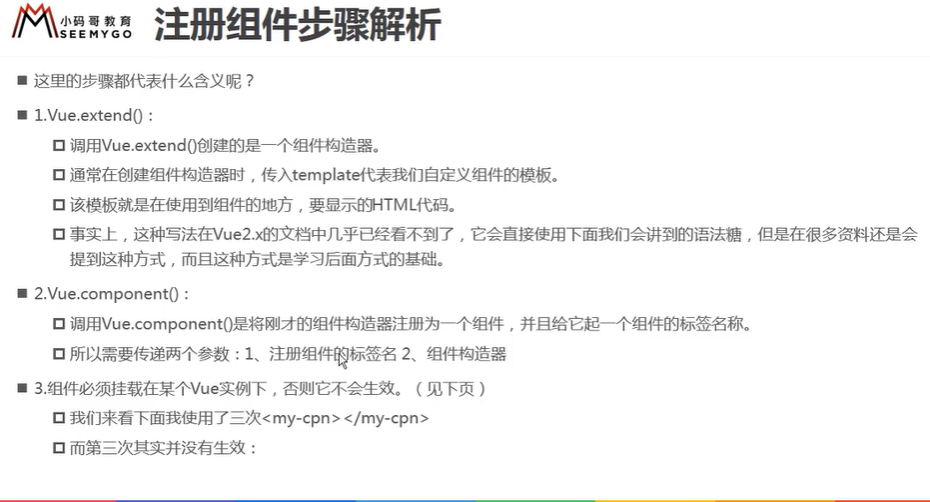
https://raw.githubusercontent.com/yzuxqz/pic-bed/master/notes-img/%E6%B3%A8%E5%86%8C%E7%BB%84%E4%BB%B6%E6%AD%A5%E9%AA%A4.png

  • 全局组件:可以在多个vue实例中使用
 1
 2
 3
 4
 5
 6
 7
 8
 9
10
11
12
13
Vue.component('button-counter',{
            data:function(){
                return{
                    count:0
                }
            },
            template:'<button @click="handle">点击了{{count}}次</button>',
            methods: {
                handle:function(){
                    this.count++;
                }
            },
        })
  • 局部组件:只能在父组件中使用
 1
 2
 3
 4
 5
 6
 7
 8
 9
10
11
12
13
14
15
16
17
18
19
20
21
22
23
<div id="app">
        <hello-world></hello-world>
        <hello-jerry></hello-jerry>
        <hello-tom></hello-tom>
</div>
var HelloWorld = {
            data: function () {
                return {
                    msg: 'HelloWorld'
                }
            },
            template: '<div>{{msg}}</div>'
        }
         var vm = new Vue({
            el: '#app',
            data: {},
            //局部组件
            components: {
                'hello-world': HelloWorld,
                'hello-tom': HelloTom,
                'hello-jerry': HelloJerry
            }
        })

==注意==:

  1. data是函数不是对象,函数可以形成一个闭包环境使得每一个组件都有独立的数据
  2. 组件模板必须是单个根元素,不能有兄弟关系
  3. 组件模板内容可以是模板字符串
  4. 组件命名方式可以是-或者驼峰命名,驼峰命名只能用在模板字符串的其他组件中,但是在普通标签模板中必须使用-的方式。

模板的分离写法

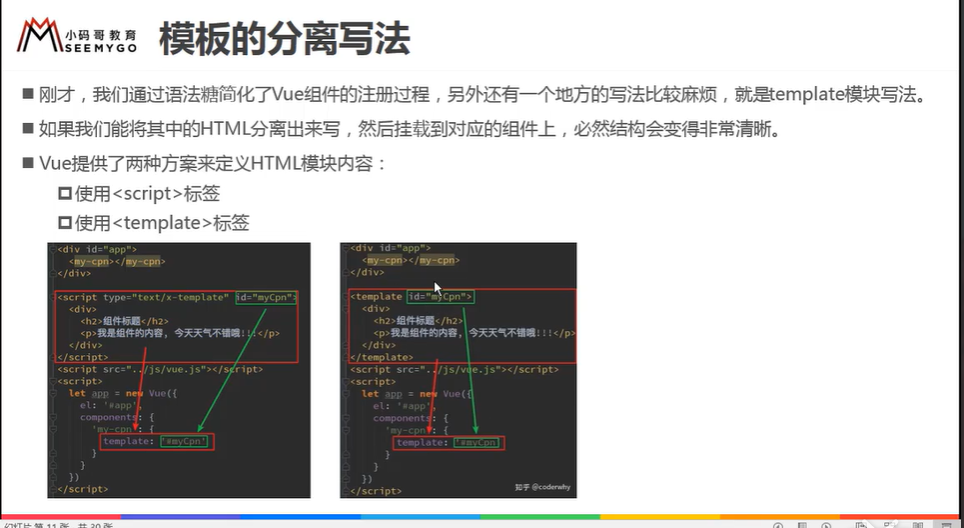
https://raw.githubusercontent.com/yzuxqz/pic-bed/master/notes-img/%E6%A8%A1%E6%9D%BF%E5%88%86%E7%A6%BB%E7%9A%84%E5%86%99%E6%B3%95.png

 1
 2
 3
 4
 5
 6
 7
 8
 9
10
11
12
13
14
15
16
17
18
19
20
21
22
23
24
25
26
27
28
29
30
31
32
33
34
35
36
37
38
<!DOCTYPE html>
<html lang="en">
<head>
  <meta charset="UTF-8">
  <title>Title</title>
</head>
<body>
<div id="app">
  <my-cpn></my-cpn>
</div>
<!--script标签,类型必须是text/x-template-->
<!--<script type="text/x-template" id="cpn">-->
<!--<div>-->
<!--  <h2>我是标题</h2>-->
<!--  <p>我是内容,哈哈</p>-->
<!--</div>-->
<!--</script>-->
<!--template标签-->
<template id="cpn">
  <div>
    <h2>我是标题</h2>
    <p>我是内容,哈哈</p>
  </div>
</template>
<script src="../vue.js"></script>
<script>
  Vue.component('my-cpn',{
    template:`#cpn`
  })
  const app = new Vue({
    el: '#app',
    data: {
      message: 'hello'
    }
  })
</script>
</body>
</html>

组件的数据存放问题

  1. 数据存放在组件自己的data属性中,组件的data属性时候一个函数,返回一个对象数据
  2. 不能使用vue实例的数据
 1
 2
 3
 4
 5
 6
 7
 8
 9
10
11
12
13
14
15
16
17
18
19
20
21
22
23
24
25
26
27
28
29
30
31
32
33
34
35
36
<!DOCTYPE html>
<html lang="en">
<head>
  <meta charset="UTF-8">
  <title>Title</title>
</head>
<body>
<div id="app">
  <my-cpn></my-cpn>
</div>
<template id="cpn">
  <div>
    <h2>我是标题</h2>
    <p>我是内容,哈哈</p>
    <p>{{title}}</p>
  </div>
</template>
<script src="../vue.js"></script>
<script>
  Vue.component('my-cpn',{
    template:`#cpn`,
    data(){
      return {
        title:'abc'
      }
    }
  })
  const app = new Vue({
    el: '#app',
    data: {
      message: 'hello'
    }
  })
</script>
</body>
</html>

Vue调试工具:vue-devtools

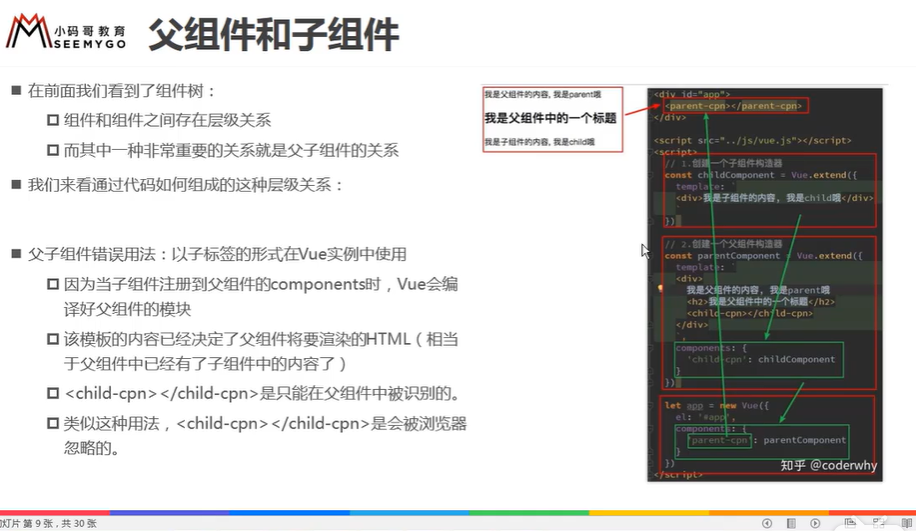
组件通信

https://raw.githubusercontent.com/yzuxqz/pic-bed/master/notes-img/%E7%88%B6%E5%AD%90%E7%BB%84%E4%BB%B6.png

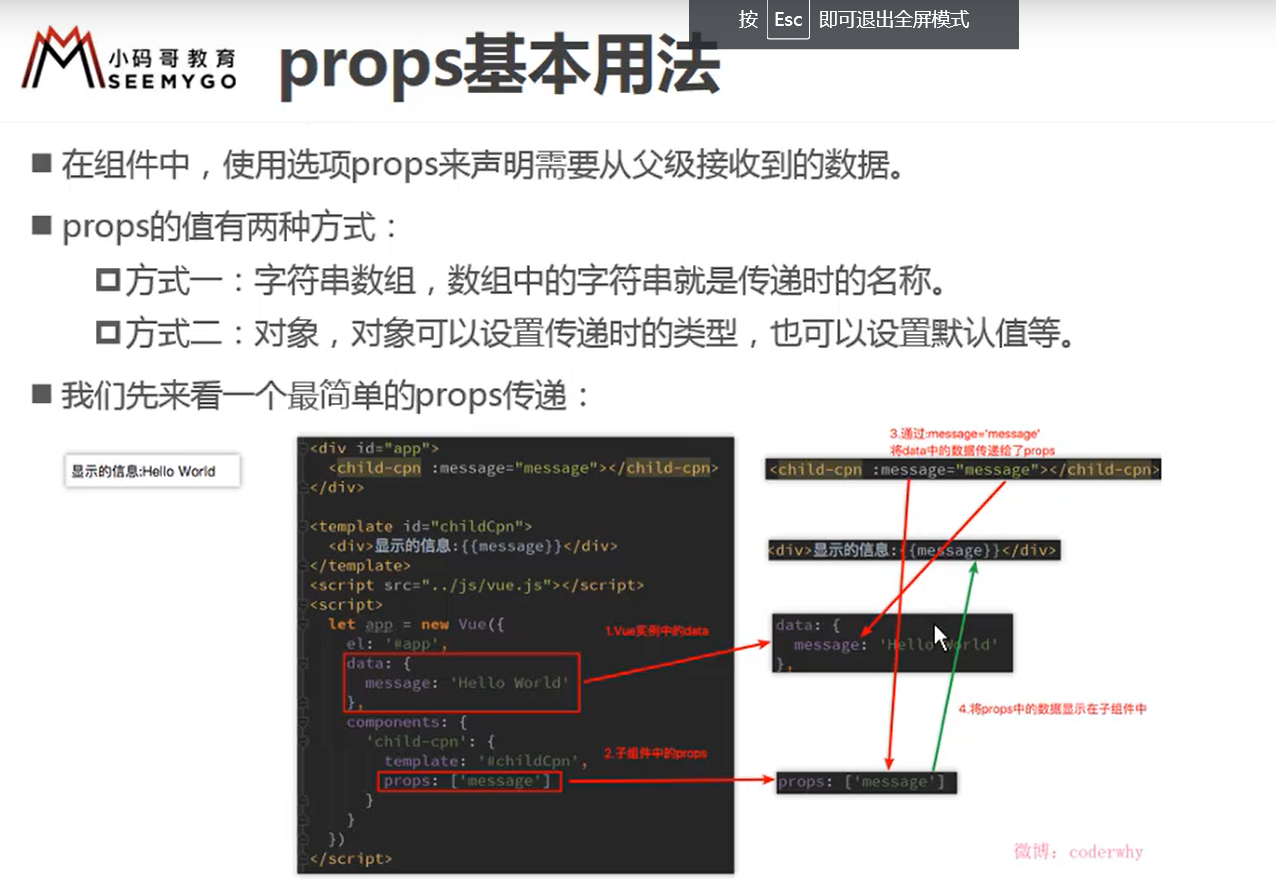
父组件传子组件

https://raw.githubusercontent.com/yzuxqz/pic-bed/master/notes-img/props%E5%9F%BA%E6%9C%AC%E7%94%A8%E6%B3%95.png

  • 父组件传值

    在父组件中给对应的子组件绑定属性(注意要用v-bind才能绑定父组件中data属性里的值,否则传递的是字符串)

    1
    2
    
    <menu-item title="来自父组件的值">{{msg}}</menu-item>//静态方式
    <menu-item :title="ptitle" content='hello'>{{msg}}</menu-item>//动态绑定属性值,属性值写在父组件的data中
    
  • 子组件接受值

    1
    2
    3
    4
    5
    6
    7
    8
    9
    
    Vue.component('menu-item', {
            props: ['title','content'],//名称和父组件中一致,如果接受的是驼峰形式,在使用时改为-,除非是在字符串模板中
            data: function () {
                return {
                    msg: '子组件本身的数据'
                }
            },
            template: '<div>{{msg + "-------"+ title + "------"+ content}}</div>'
        })
    
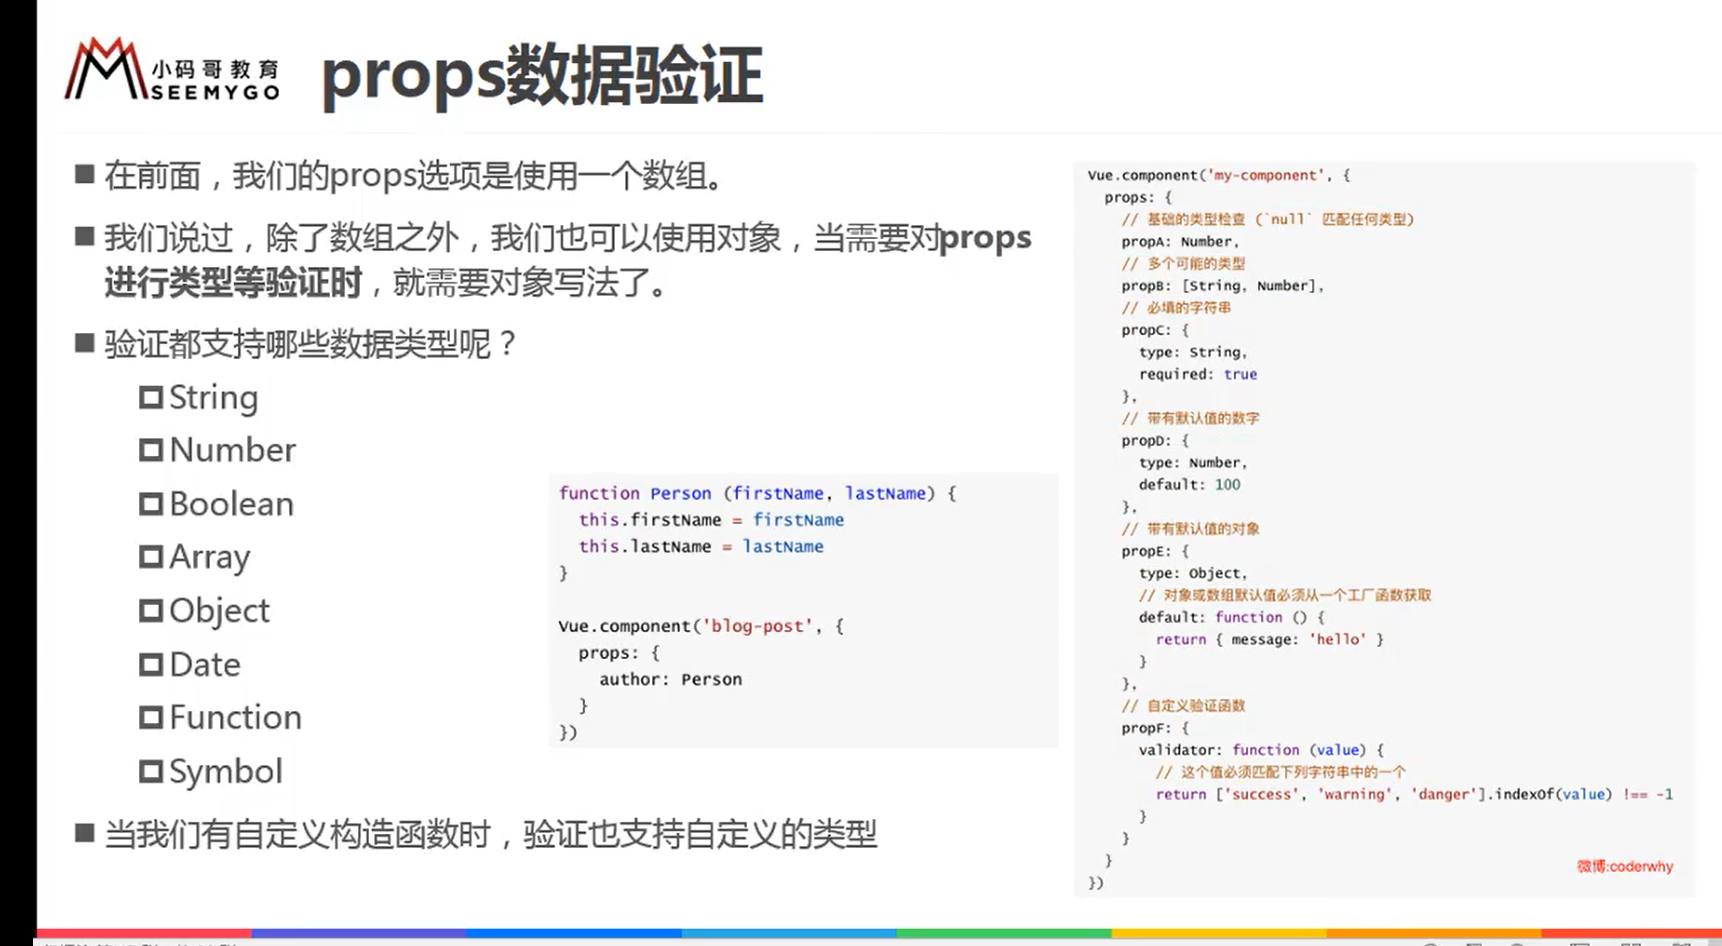
props数据验证

https://raw.githubusercontent.com/yzuxqz/pic-bed/master/notes-img/props%E6%95%B0%E6%8D%AE%E9%AA%8C%E8%AF%81.png

 1
 2
 3
 4
 5
 6
 7
 8
 9
10
11
12
13
14
15
16
17
18
19
20
21
22
23
24
25
26
27
28
29
30
31
32
33
34
35
36
37
38
39
40
41
42
43
44
45
46
47
48
49
50
<!DOCTYPE html>
<html lang="en">
<head>
  <meta charset="UTF-8">
  <title>Title</title>
</head>
<body>
<div id="app">
  <cpn :cmovies="movies"></cpn>
</div>
<template id="cpn">
  <div>
    <h2>{{cmovies}}</h2>
  </div>
</template>
<script src="../vue.js"></script>
<script>
  const cpn={
    template:`#cpn`,
    data(){
      return {}
    },
    props:{
      // 1.类型限制
      // cmovies:Array,

      // 2.提供一些默认值
      cmovies:{
        type:Array,
        default(){
          return []
        },//如果不传的默认值,类型是对象或者数组时,必须使用函数的返回值
        required:true//必须传值,否则报错
      }
    }
  }

  const app = new Vue({
    el: '#app',
    data: {
      message: 'hello',
      movies:['1','2','3']
    },
    components:{
      cpn
    }
  })
</script>
</body>
</html>
props驼峰标识
  1. v-bind不支持驼峰命名,只能用-连接

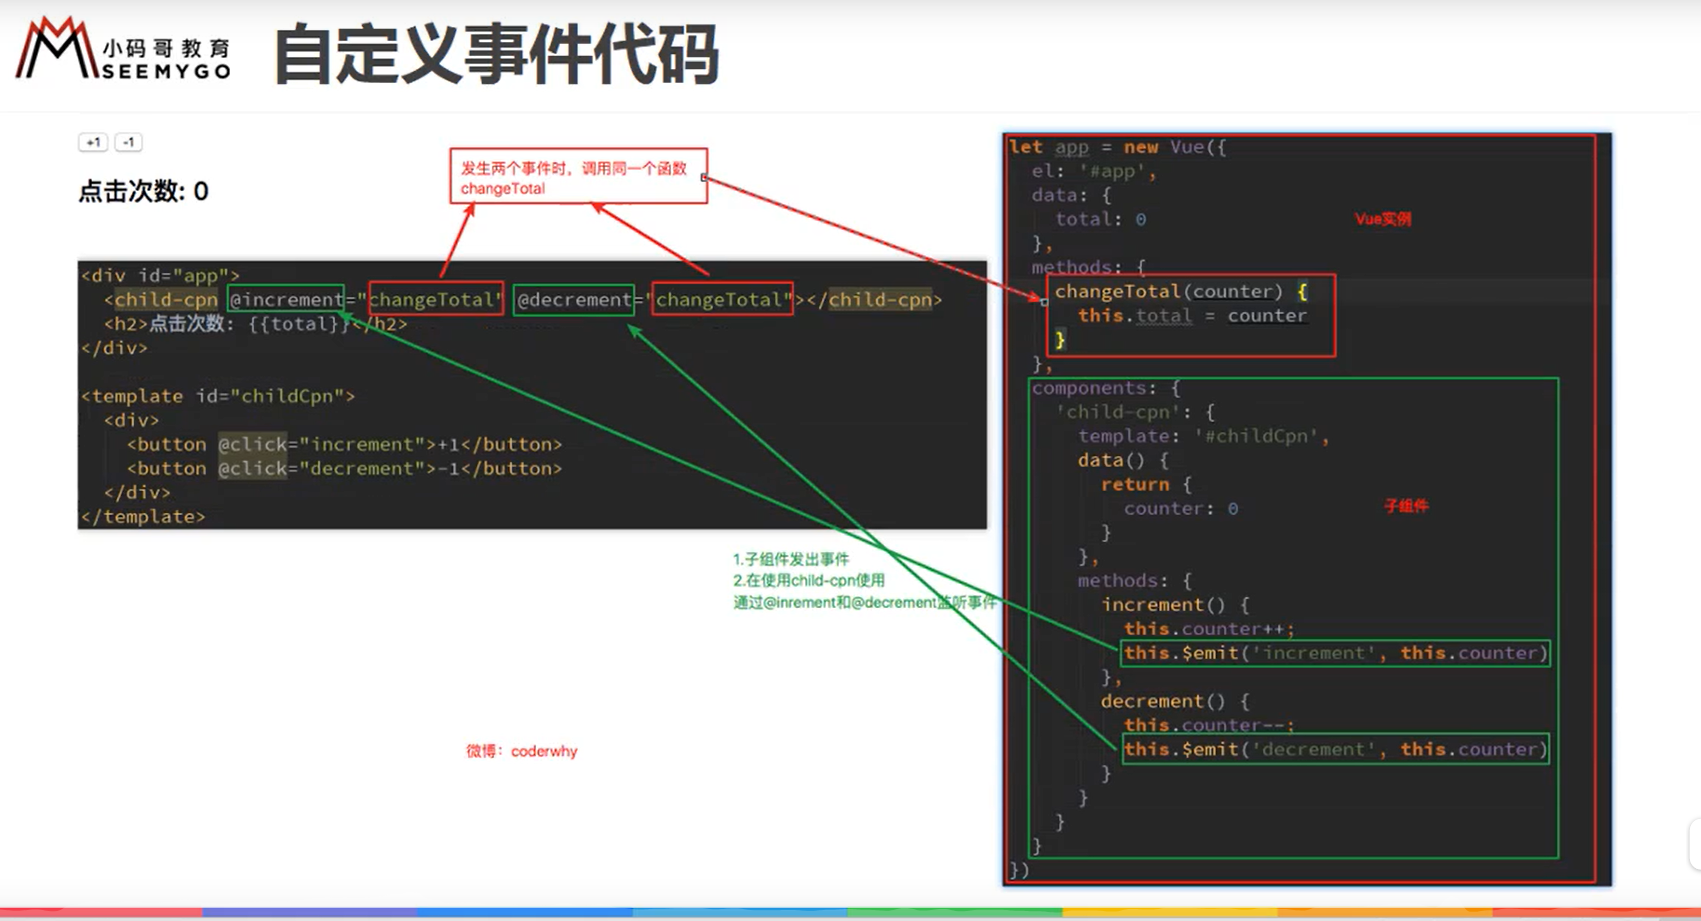
子组件传父组件

  1. 子组件通过this.$emit(‘事件名’,参数)发射事件

  2. 父组件监听子组件的事件

    https://raw.githubusercontent.com/yzuxqz/pic-bed/master/notes-img/%E8%87%AA%E5%AE%9A%E4%B9%89%E4%BA%8B%E4%BB%B6.png

子组件和双向绑定

  1. 子组件中不能双向绑定props中的值,虽然可以更改,但是不推荐这么做,因为props中的值应该来源于父组件,子组件没有权力自己去修改

  2. 如果要绑定props中的值,要先用data返回一个对象,然后去绑定data中的数据

    1
    2
    3
    4
    5
    6
    
    data(){
      return {
        dnum1:this.cnum1,
        dnum2:this.cnum2
      }
    }
    
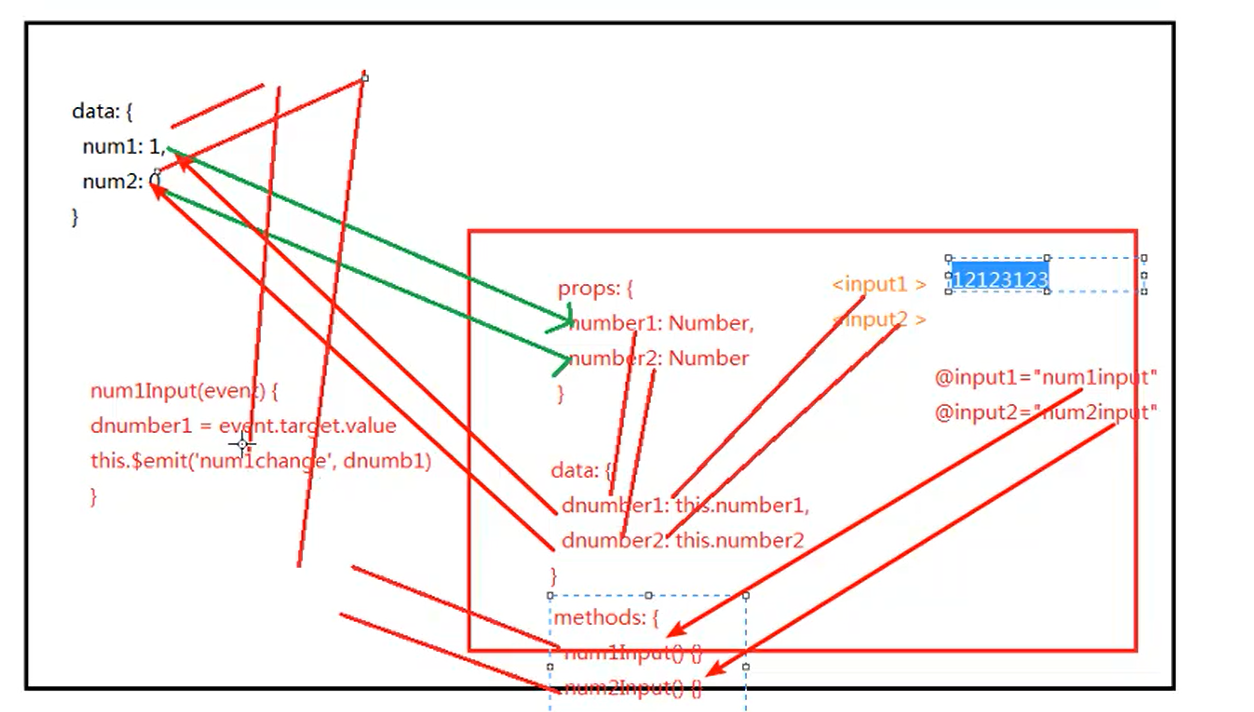
  3. 如果要将子组件输入框的值传递给父组件,首先将v-model拆分,v-bind绑定value来显示data中的值,@input绑定事件来修改data中的值,并在事件中添加this.$emit(’num2-change’,this.dnum2)来发射事件,父组件来监听事件

    https://raw.githubusercontent.com/yzuxqz/pic-bed/master/notes-img/%E7%88%B6%E5%AD%90%E7%BB%84%E4%BB%B6%E7%BB%93%E5%90%88%E5%8F%8C%E5%90%91%E7%BB%91%E5%AE%9A.png

兄弟组件

  1. 原理:通过事件中心管理组件中的通信

  2. 事件中心:var eventHub = new Vue()

  3. 监听事件:eventHub.$on(‘事件名称’,addTodo)

    销毁事件:eventHub.$off(‘事件名称’)

  4. 触发事件:eventHub.$emit(‘事件名称’,id) //事件名称与监听的一致

  5. 销毁事件:hub.$off(‘事件名’)

    ==步骤==:

    1. 兄弟组件按钮绑定点击事件
    2. 创建事件池
    3. 在组件中给事件池中绑定事件,每一个事件的名字都不一样
    4. 在点击事件中触发事件,也就是散发事件,到事件池中去触发一样的事件名的事件
 1
 2
 3
 4
 5
 6
 7
 8
 9
10
11
12
13
14
15
16
17
18
19
20
21
22
23
24
25
26
27
28
29
30
31
32
33
34
35
36
37
38
39
40
41
42
43
44
45
46
47
48
49
50
51
52
53
54
55
56
57
58
59
60
61
62
63
64
65
66
67
68
69
70
71
72
73
74
75
<body>
    <div id="app">
        <div>父组件</div>
        <div>
            <button @click='handle'> 销毁事件</button>
        </div>
        <text-tom></text-tom>
        <text-jerry></text-jerry>
    </div>
    <script src="../js/vue.js"></script>
    <script>
        //提供事件中心
        var hub = new Vue();
        Vue.component('text-tom', {
            data: function () {
                return {
                    num: 0
                }
            },
            template: `
            <div>
            <div>Tom:{{num}}</div>
            <button @click='handle'>给兄弟组件+2</button>
            </div>
            `,
            methods: {
                handle: function () {
                    //触发jerry事件
                    hub.$emit('jerry-event', 2)
                }
            },
            mounted: function () {
                //监听事件
                hub.$on('tom-event', (val) => {
                    this.num += val;
                })
            },
        });
        Vue.component('text-jerry', {
            data: function () {
                return {
                    num: 0
                }
            },
            template: `
            <div>
            <div>Jerry:{{num}}</div>
            <button @click='handle'>给兄弟组件+1</button>
            </div>
            `,
            methods: {
                handle: function () {
                    hub.$emit('tom-event', 1)
                }
            },
            mounted: function (val) {
                hub.$on('jerry-event', (val) => {
                    this.num += val;
                })
            },
        })
        var vm = new Vue({
            el: '#app',
            data: {

            },
            methods: {
                handle: function () {
                    hub.$off('tom-event');
                    hub.$off('jerry-event');
                }
            }
        })
    </script>
</body>

组件访问

父组件直接访问子组件

  1. 通过$children:不常用
1
2
3
4
5
6
7
8
    methods:{
      btnClick(){
        //访问子组件的methods
        this.$children[0].showMessage()
        //访问子组件的data
        console.log(this.$children[0].name)
      }
    }

2.通过$ref:对象类型(默认为空)

  • 先在子组件上添加ref属性
  • 然后通过this.$ref获取
1
2
3
4
5
  <cpn ref="aaa"></cpn>
  	methods:{
      btnClick(){
        console.log(this.$refs);
      }

子组件直接访问父组件

  1. 在子组件中使用this.$parent,但是一般不建议使用,因为这样会增加组件化开发的耦合度
1
2
3
4
5
6
7
8
 ccpn: {
            template: `#ccpn`,
            methods: {
              btnClick() {
                // 访问父组件
                console.log(this.$parent.name);
              }
            }

访问根组件

  1. $root,即访问vue实例

组件插槽

基本使用

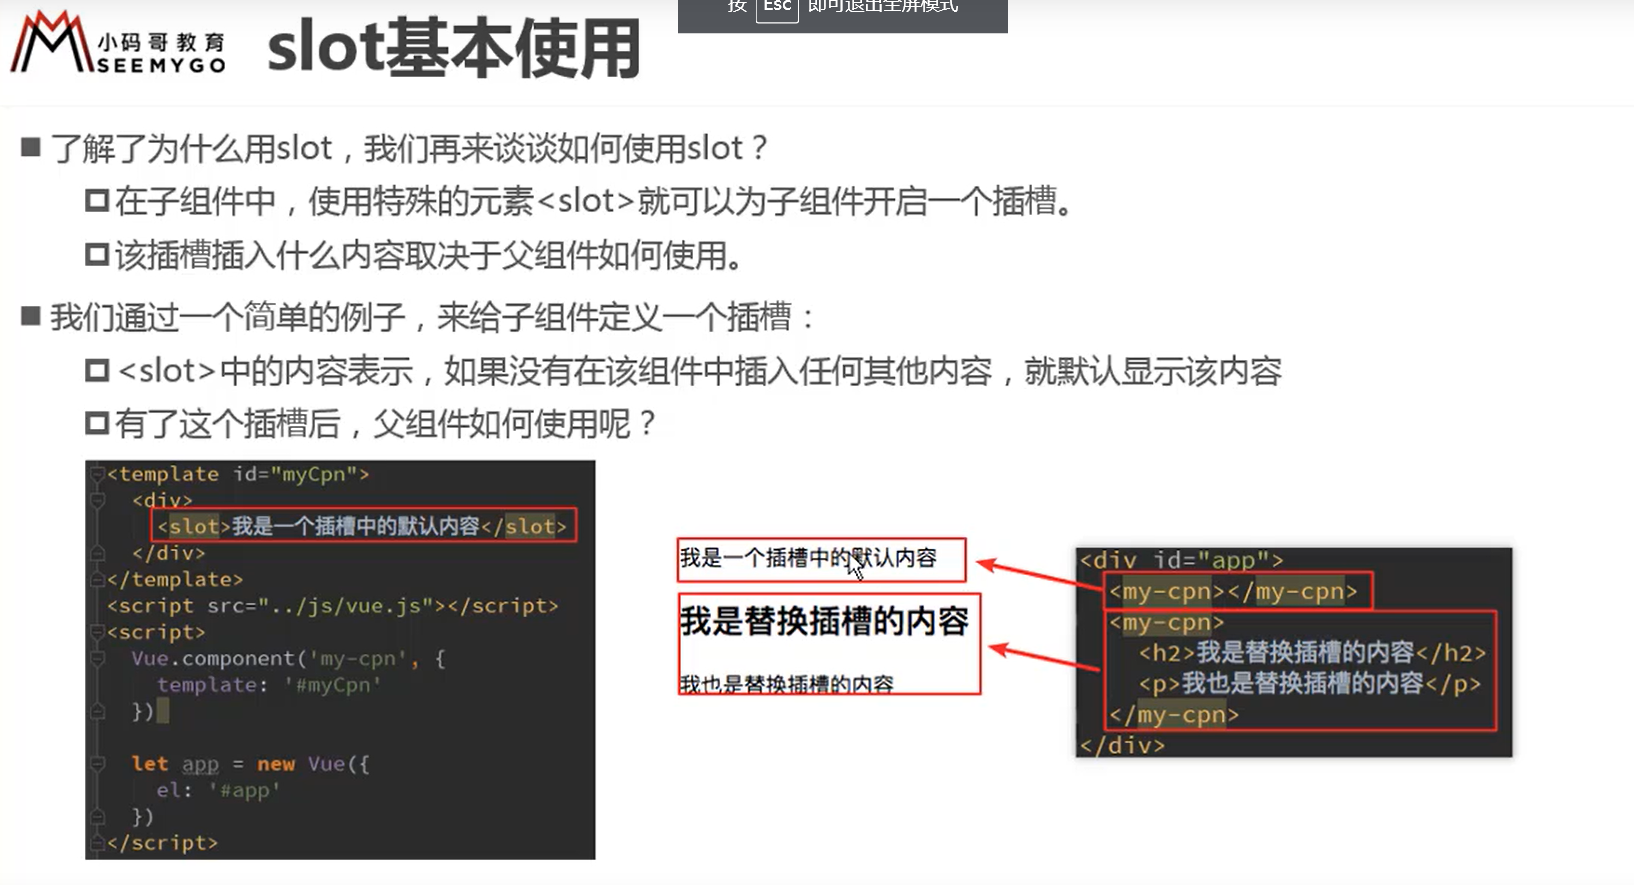
https://raw.githubusercontent.com/yzuxqz/pic-bed/master/notes-img/slot%E5%9F%BA%E6%9C%AC%E4%BD%BF%E7%94%A8.png

  1. 在组件中使用
  2. 默认值写在标签中间
  3. 如果有多个值,同时放入组件中替换时,一起作为替换元素

作用:父组件向子组件传递模板内容

content

==注意==:子组件会预留一个位置,就是所谓的插槽来存放父组件在使用子组件时标签中的内容,插槽内容会随着content的改变而改变,如果content为空,则显示slot标签中的默认内容,有了就会覆盖默认内容

 1
 2
 3
 4
 5
 6
 7
 8
 9
10
11
12
13
14
15
16
17
18
19
20
21
22
<body>
    <div id="app">
        <test-jerry>有bug</test-jerry>//标签中的内容会替换默认值
        <test-jerry>有一个bug发生</test-jerry>
    </div>
    <script src="../js/vue.js"></script>
    <script>
        Vue.component('test-jerry', {
            template: `
            <div>
            <span>ERROR:</span>
            <slot>默认内容</slot>
            </div>
            `
        })
        var vm = new Vue({
            el: '#app',
            data: {
            }
        })
    </script>
</body>

具名插槽

步骤:

  1. 在模板字符串中给slot标签name值
  2. 在父组件中使用时,给标签slot=“name”从而给对应的插槽赋值
 1
 2
 3
 4
 5
 6
 7
 8
 9
10
11
12
13
14
15
16
17
18
19
20
21
22
23
24
25
26
27
28
29
<body>
<div id="app">
  <cpn>
    <span v-slot="center">666</span>
  </cpn>
</div>
<template id="cpn">
  <div>
    <h2>我是组件</h2>
    <slot name="left"><span>左边的</span></slot>
    <slot name="center"><span>中间的</span></slot>
    <slot name="right"><span>右边的</span></slot>
  </div>
</template>
<script src="../vue.js"></script>
<script>
  const app = new Vue({
    el: '#app',
    data: {
      message: 'hello'
    },
    components: {
      cpn: {
        template: `#cpn`,
      }
    }
  })
</script>
</body>
  • 渲染多条插槽赋值时

     1
     2
     3
     4
     5
     6
     7
     8
     9
    10
    
     <base-layout>
                <template slot="header">
                    <p>header赋值1</p>
                    <p>header赋值2</p>
                </template>
                <template slot="body">
                    <p>body赋值1</p>
                    <p>body赋值2</p>
                </template>
      </base-layout>
    

作用域插槽

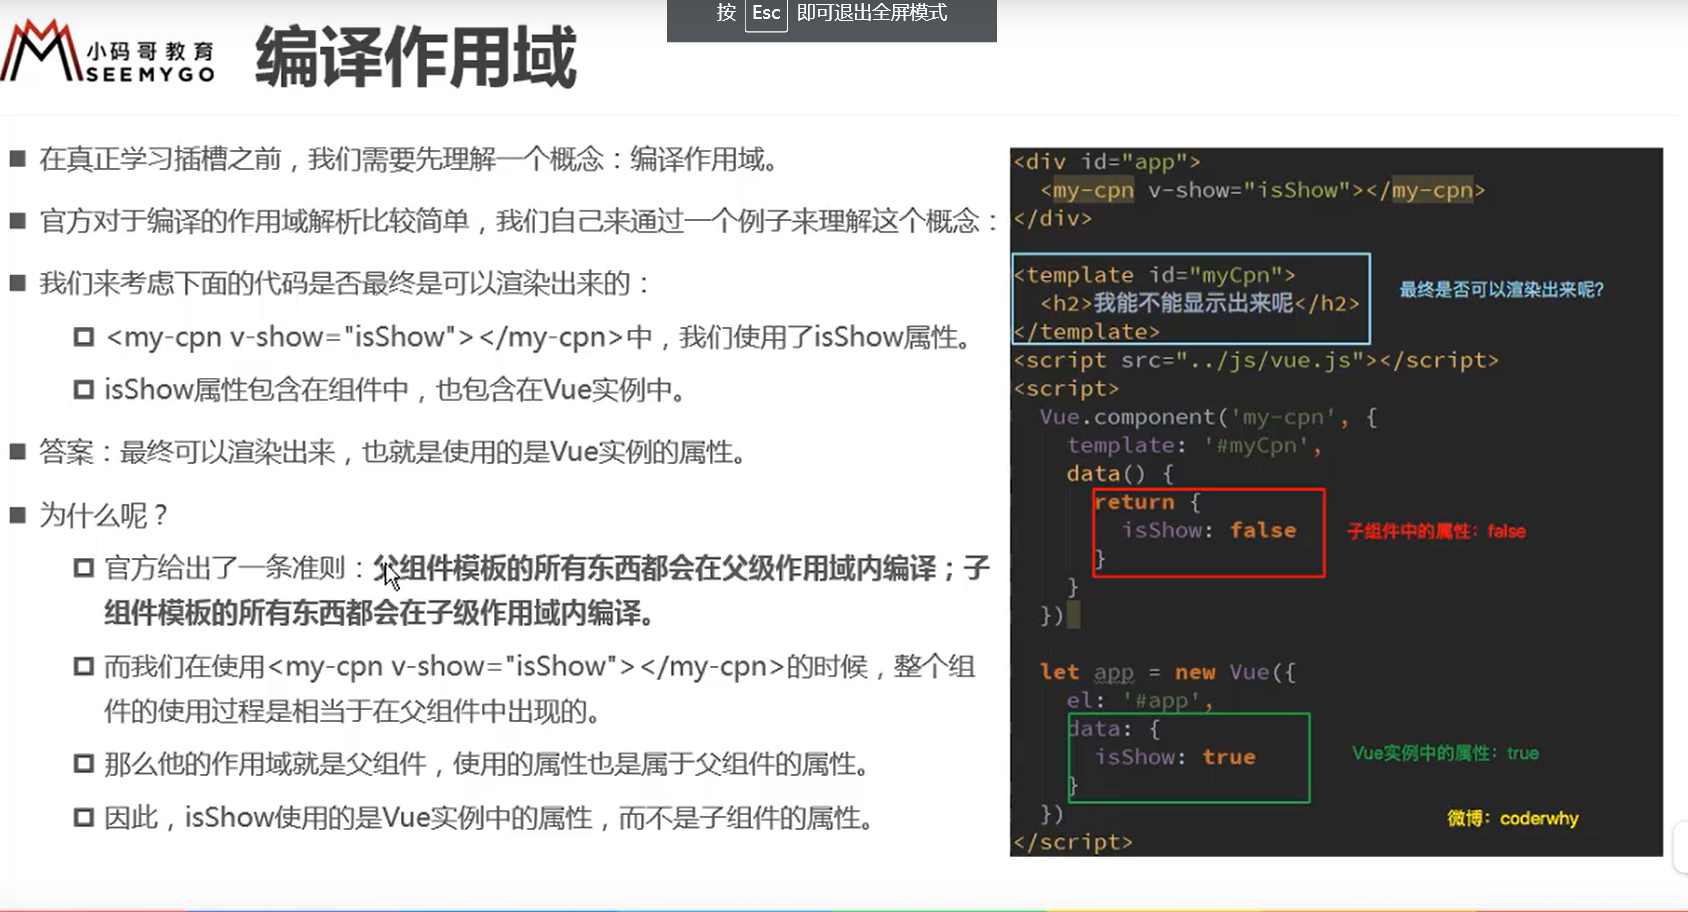
https://raw.githubusercontent.com/yzuxqz/pic-bed/master/notes-img/%E7%BC%96%E8%AF%91%E4%BD%9C%E7%94%A8%E5%9F%9F.png

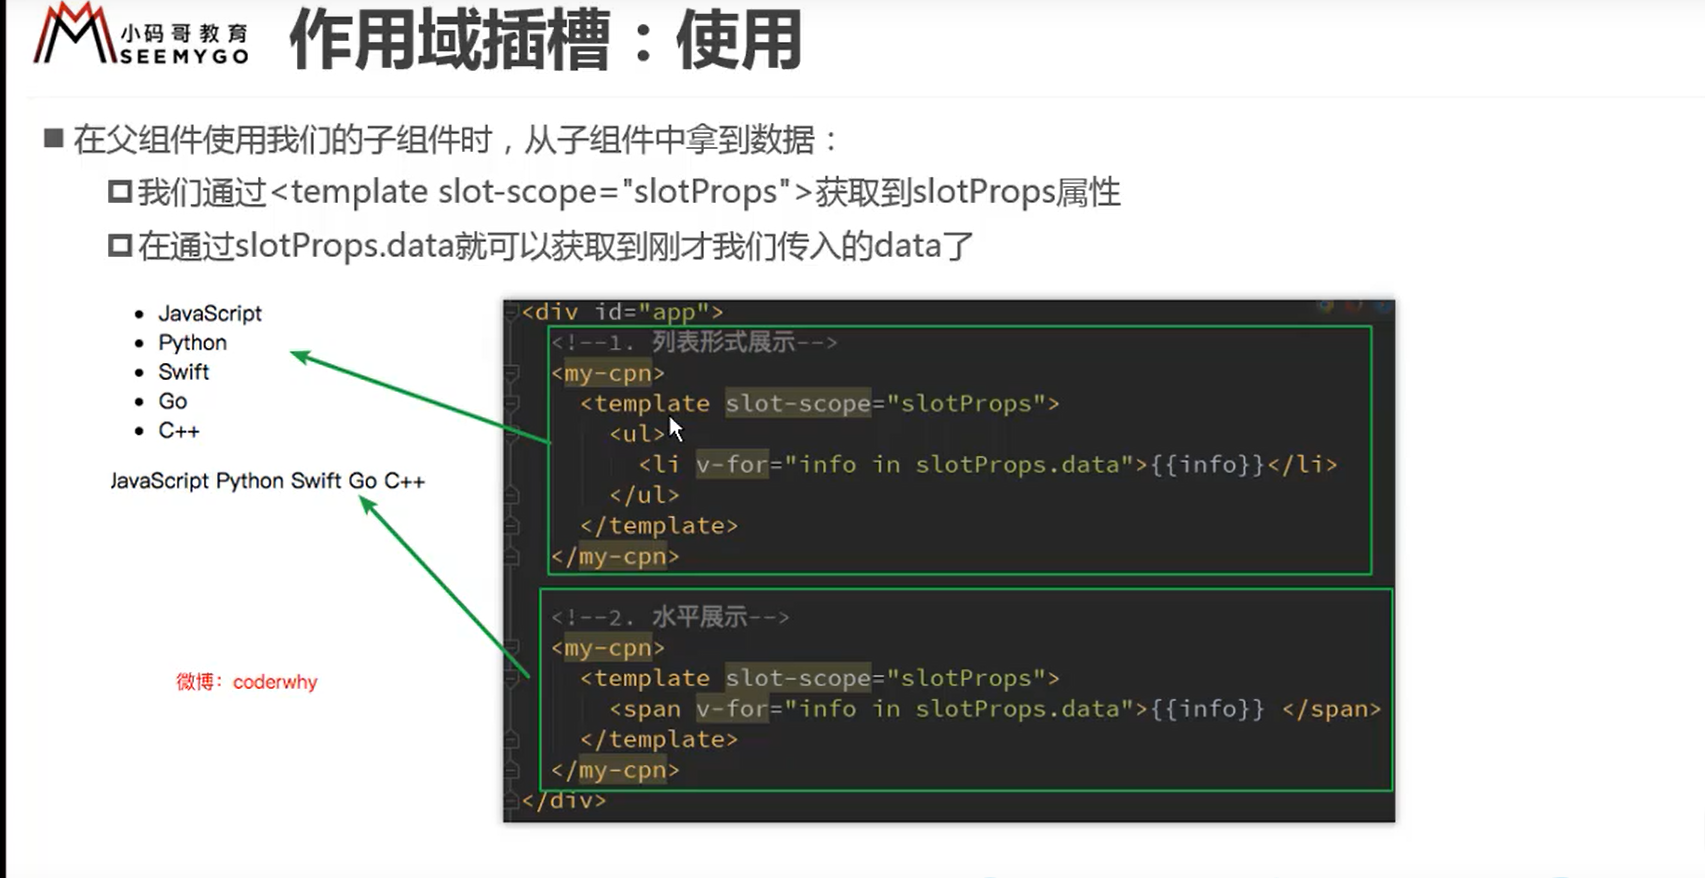
应用场景:父组件对子组件的内容进行加工处理,父组件替换子组中的标签,但是内容由子组件提供

https://raw.githubusercontent.com/yzuxqz/pic-bed/master/notes-img/%E4%BD%9C%E7%94%A8%E5%9F%9F%E6%8F%92%E6%A7%BD%E7%9A%84%E4%BD%BF%E7%94%A8.png

步骤:

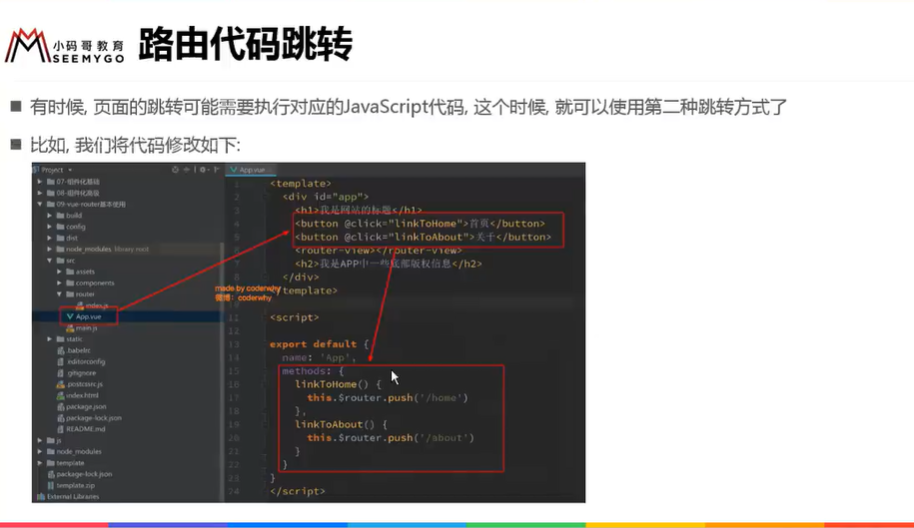
  1. 子组件中把插槽中的值作为属性传给父组件,当然子组件的数据也可以来自父组件
  2. 父组件通过 slot-scope=‘自定义name’,name.子组件中绑定的属性,来获得子组件传来的值,这个值就是子组件中绑定的属性对应的值,==注意==要在