React入门
相关js库
1.react.js:React核心库
2.react-dom.js:提供操作DOM的react扩展库
3.babel.min.js:解析JSX语法代码转为JS代码库
4.prop-types.js:用于对组件标签属性进行限制
创建虚拟DOM的两种方式
使用jsx创建虚拟DOM
1
2
3
4
5
6
|
<script type="text/babel">
  //1. 创建虚拟dom
  const VDOM = <h1 id="title">Hello,React</h1>
  //2. 渲染虚拟dom到页面
  ReactDOM.render(VDOM,document.getElementById('test'))
</script>
|
使用js创建虚拟DOM
- React.createElement(标签名,标签属性,标签内容),==一般不用====,因为嵌套过于麻烦==
1
2
3
4
5
6
|
<script type="text/javascript">
  //1. 创建虚拟dom
  const VDOM = React.createElement('h1',{id:'title'},React.createElement('span',{},'内容'))
  //2. 渲染虚拟dom到页面
  ReactDOM.render(VDOM,document.getElementById('test'))
</script>
|
关于虚拟DOM
- 本质是Object类型的对象
- 虚拟DOM比较“轻”,真实DOM比较“重”,因为虚拟DOM是React内部在用,无需真实DOM上的那么多属性
- 虚拟DOM最终会被React转为真实DOM,呈现在页面上
JSX语法规则
- 定于虚拟DOM,不用写引号
- 标签中混入JS表达式时要用{}
- 样式的类名指定不要用class,要用className
- 内联样式要用style={{key:value}}的形式去写
- 只有一个根标签
- 标签必须闭合
- 标签首字符
- 若小写字母开头,则将标签改为html中同名的元素,若html中没有改标签对应的同名元素,则报错
- 若大写字母开头,react会去渲染对应的组件,若组件没有定义,则报错
 1
 2
 3
 4
 5
 6
 7
 8
 9
10
11
12
13
14
15
16
17
18
19
|
<script>
  const data = ['Angular', 'React', 'Vue']
  //1. 创建虚拟dom
  const VDOM = (
    <div>
      <h1>Hello,React</h1>
      <ul>
        {
            // map会有返回值,foreach会修改原来的数组
          data.map((item, index) => {
            return <li key={index}>{item}</li>
          })
        }
      </ul>
    </div>
  )
  //2. 渲染虚拟dom到页面
  ReactDOM.render(VDOM, document.getElementById('test'))
</script>
|
JS表达式与JS语句
表达式
一个表达式会产生一个值,可以放在任何一个需要值得地方
- a
- a+b
- demo(1)
- arr.map()
- function test(){}
语句(代码)
- if(){}
- for(){}
- switch(){case:xxxx}
React面向组件编程
模块与组件
模块
-
理解:向外提供特定功能的js程序, 一般就是一个js文件
-
为什么要拆成模块:随着业务逻辑增加,代码越来越多且复杂。
-
作用:复用js, 简化js的编写, 提高js运行效率
组件
-
理解:用来实现局部功能效果的代码和资源的集合(html/css/js/image等等)
-
为什么要用组件: 一个界面的功能更复杂
-
作用:复用编码, 简化项目编码, 提高运行效率
模块化与组件化
模块化
当应用的js都以模块来编写,这个应用就是一个模块化的应用
组件化
当应用是以多组件的方式实现,这个应用就是一个组件化的应用
React中定义组件
函数式组件
- 声名函数,函数名首字母大写
- 返回JSX
- render中渲染组件
==注意==:函数组件中的this为undefined,因为babel编译后开启了严格模式
 1
 2
 3
 4
 5
 6
 7
 8
 9
10
11
12
13
14
15
16
|
<script>
  //1.声名函数式组件
  function Demo() {
    console.log(this) //undefined(babel编译后开启了严格模式)
    return <div>
      <h2>我是用函数定义的组件(适用于简单组件的定义)</h2>
      <span>2</span>
    </div>
  }

  //2.渲染组件
  ReactDOM.render(<Demo/>, document.getElementById('test'))
  // 执行了ReactDOM.render()
  //   1.React解析组件标签,找到了MyComponent组件
  //   2.发现组件是使用函数定义的,随后调用了函数,将返回的虚拟DOM转为真实DOM,随后呈现在页面中
</script>
|
类式组件
- 继承自React.Component
- render中的this执向组件实例对象,不再是babel解析后的undefined
 1
 2
 3
 4
 5
 6
 7
 8
 9
10
11
12
13
14
15
16
17
18
|
<script>
  //创建类式组件
  class MyComponent extends React.Component{
    render(){
      //render中的this?--MyComponent的实例对象
      console.log(this)
      //render是放在哪里的?--MyComponent的原型对象上,供实例使用
      return <h2>我是用类定义的组件(适用于复杂组件的定义)</h2>
    }
  }
  ReactDOM.render(<MyComponent/>,document.getElementById('test'))
  /*
  * 执行了ReactDOM.render(<MyComponent/>)之后,发生了什么
  * 1.React解析组件标签,找到Component组件
  * 2.发现组件是使用类定义的,随后new出来该类的实例,并通过该实例调用到原型上的render方法
  * 3.将render返回的虚拟DOM转为真实DOM,随后呈现在页面中
  * */
</script>
|
组件实例的三大属性
state
- state是组件对象最重要的属性, 值是对象(可以包含多个key-value的组合)
- 组件被称为"状态机", 通过更新组件的state来更新对应的页面显示(重新渲染组件)
- 在state被修改时会调用render
==注意==:
-
组件中render方法中的this为组件实例对象
-
组件自定义的方法中this为undefined,如何解决?
-
强制绑定this: 通过函数对象的bind()
-
赋值语句+箭头函数(开发常用)
-
状态数据,不能直接修改或更新
 1
 2
 3
 4
 5
 6
 7
 8
 9
10
11
12
13
14
15
16
|
<script>
  class Weather extends React.Component{
    constructor(props) {
      super(props)
      // 初始化状态
      this.state={isHot:false}
    }
    render(){
      console.log(this)
      const {isHot} = this.state
      // 使用
      return <h1>今天天气很{isHot?'炎热':'凉爽'}</h1>
    }
  }
  ReactDOM.render(<Weather/>,document.getElementById('test'))
</script>
|
获取state中的值
类中方法中的this
- 类中定义的方法会自动开启==局部严格模式==
 1
 2
 3
 4
 5
 6
 7
 8
 9
10
11
12
13
14
15
16
17
|
<script>
  class Student{
    constructor(name,age) {
      this.name = name
      this.age = age
    }
    say(){
      // 默认use strict
      console.log(this)
    }
  }

  let s1 = new Student('xqz',12)
  s1.say() //this指向Student实例
  let say = s1.say
  say() //this为undefined
</script>
|
React组件类中的this
 1
 2
 3
 4
 5
 6
 7
 8
 9
10
11
12
13
14
15
16
17
18
19
20
21
|
<script>
  class Weather extends React.Component{
    constructor(props) {
      super(props)
      this.state={isHot:false}
    }
    render(){
      const {isHot} = this.state
      return <h1 onClick={this.changeWeather}>今天天气很{isHot?'炎热':'凉爽'}</h1>
    }

    changeWeather() {
      // 只要通过weather的实例对象去调用了changeWeather,那么this就是实例对象
      // 由于changeWeather是作为onClick的回调, 不是通过实例调用的,是直接调用
      // 类中的方法开启了局部的严格模式,所以this为undefined
      console.log(this.state)
    }
  }
  ReactDOM.render(<Weather/>,document.getElementById('test'))

</script>
|
如何解决
 1
 2
 3
 4
 5
 6
 7
 8
 9
10
11
12
13
14
15
16
17
18
19
20
21
22
|
<script>
  class Weather extends React.Component{
    constructor(props) {
      super(props)
      this.state={isHot:false}
        // this.changeWeather是原型上的方法,通过bind,将this指向实例
        // demo为实例上的方法,就是把原型上的changeWeather方法复刻一份,修改this后添加到实例身上,相当于重写
      	// 在render方法中调用的是实例身上的方法
      this.changeWeather = this.changeWeather.bind(this)
    }
    render(){
      const {isHot} = this.state
      return <h1 onClick={this.changeWeather}>今天天气很{isHot?'炎热':'凉爽'}</h1>
    }

    changeWeather() {
      console.log(this.state)
    }
  }
  ReactDOM.render(<Weather/>,document.getElementById('test'))

</script>
|
修改state中的值
React.Component.prototype中有setState方法,通过组件实例.proto->组件类.prototype->React.Component父类的prototype中寻找到
- constructor调用一次
- render调用多次
- changeWeather点几次调用几次
==注意==:
- this必须在调用了super之后才有
 1
 2
 3
 4
 5
 6
 7
 8
 9
10
11
12
13
14
15
16
17
18
19
20
|
<script>
  class Weather extends React.Component{
    constructor(props) {
      super(props)
      this.state={isHot:false}
      this.changeWeather = this.changeWeather.bind(this)
    }
    render(){
      const {isHot} = this.state
      return <h1 onClick={this.changeWeather}>今天天气很{isHot?'炎热':'凉爽'}</h1>
    }

    changeWeather() {
      const {isHot} = this.state
      //注意:状态不可直接更改,要借助内置API
      this.setState({isHot:!isHot})
      }
  }
  ReactDOM.render(<Weather/>,document.getElementById('test'))
</script>
|
state的简写形式
 1
 2
 3
 4
 5
 6
 7
 8
 9
10
11
12
13
14
15
16
17
18
19
20
|
<script>
  class Weather extends React.Component {
    // 此时state在每一个实例自身
    state = {isHot: false}

    render() {
      const {isHot} = this.state
      return <h1 onClick={this.changeWeather}>今天天气很{isHot ? '炎热' : '凉爽'}</h1>
    }

    // 此时方法和state一样,用赋值语句,成了实例自身的一个属性,用箭头函数,this指向Weather实例,否则普通函数this为undefined。如果不用赋值语句,那么函数是在原型上的
    changeWeather = () => {
      const {isHot} = this.state
      this.setState({isHot: !isHot})
    }
  }

  ReactDOM.render(<Weather/>, document.getElementById('test'))

</script>
|
props
props的基本使用
组件实例上有props属性
==注意==:
- props是只读的,修改会报错
 1
 2
 3
 4
 5
 6
 7
 8
 9
10
11
12
13
14
15
16
17
|
<script>
  class Person extends React.Component{
    render(){
        //获取值
      const {name,age,sex} = this.props
      return (
        <ul>
          <li>姓名:{name}</li>
          <li>性别:{age}</li>
          <li>年龄:{sex}</li>
        </ul>
      )
    }
  }
  //传值
  ReactDOM.render(<Person name="xqz" age="20" sex="man"/>,document.getElementById('test'))
</script>
|
props批量传递
使用扩展运算符传递
 1
 2
 3
 4
 5
 6
 7
 8
 9
10
11
12
13
14
15
16
17
|
<script>
  class Person extends React.Component{
    render(){
      const {name,age,sex} = this.props
      return (
        <ul>
          <li>姓名:{name}</li>
          <li>性别:{age}</li>
          <li>年龄:{sex}</li>
        </ul>
      )
    }
  }
  const p = {name:'老刘',age:18,sex:'女'}
  //这里的...p并不是复制对象,原生中不能用展开运算符操作对象,但是这里有react.development.js和babel所以可以,但是不能随意使用,仅仅适用于标签属性的传递,这里的{}只是代表里面要写js表达式
  ReactDOM.render(<Person {...p}/>,document.getElementById('test'))
</script>
|
对props进行限制
-
组件类的proTypes属性(react模块里的要求):对标签属性进行类型,必要性的限制
-
PropTypes是因为引入了prop-types.js模块
1
2
3
4
5
6
7
|
// 对标签属性进行类型,必要性的限制
Person.propTypes={
  name:PropTypes.string.isRequired, //限制name必传,且为字符串
  sex:PropTypes.string,
  age:PropTypes.number,
  speak:PropTypes.func //限制speak为function
}
|
-
组件类的defaultProps属性:指定默认标签属性
1
2
3
4
5
|
// 指定默认标签属性
Person.defaultProps={
  sex:'不男不女',
  age:18
}
|
-
使用组件时传递
1
2
3
4
5
|
const p = {name:'老刘',age:18}
ReactDOM.render(<Person name="xqz" age={19} sex="man" speak={speak}/>,document.getElementById('test2'))
function speak() {
  console.log(1)
}
|
props简写
将propTypes和defaultProps设置为组件类的静态属性
 1
 2
 3
 4
 5
 6
 7
 8
 9
10
11
12
13
14
15
16
17
18
19
20
21
22
23
24
25
|
class Person extends React.Component{
  // 对标签属性进行类型,必要性的限制
  static propTypes={
    name:PropTypes.string.isRequired,
    sex:PropTypes.string,
    age:PropTypes.number,
    speak:PropTypes.func
  }
  // 指定默认标签属性
  static defaultProps={
    sex:'不男不女',
    age:18
  }
  render(){
    const {name,age,sex} = this.props
    // this.props.name = 'xqz' //报错,因为props是只读的
    return (
      <ul>
        <li>姓名:{name}</li>
        <li>性别:{age+1}</li>
        <li>年龄:{sex}</li>
      </ul>
    )
  }
}
|
函数式组件使用props
- 组件传递方式不变,通过参数接收
- 对props的限制和默认值只能写在函数外面
 1
 2
 3
 4
 5
 6
 7
 8
 9
10
11
12
13
14
15
16
17
18
19
20
21
22
23
|
function Person(props){
  console.log(props)
  const {name,age,sex} = props
  return (
    <ul>
      <li>姓名:{name}</li>
      <li>性别:{age+1}</li>
      <li>年龄:{sex}</li>
    </ul>
  )
}
  // 对标签属性进行类型,必要性的限制
  Person.propTypes={
    name:PropTypes.string.isRequired,
    sex:PropTypes.string,
    age:PropTypes.number
  }
  // 指定默认标签属性
  Person.defaultProps={
    sex:'不男不女',
    age:18
  }
ReactDOM.render(<Person name="xqz" age={19}/>,document.getElementById('test2'))
|
refs与事件处理
string类型的ref(已过时)
- 直接在标签上定义ref,通过this.refs使用
- 会有效率问题,已经过时
 1
 2
 3
 4
 5
 6
 7
 8
 9
10
11
12
13
14
15
16
17
18
19
20
21
22
|
<script>
  class Demo extends React.Component{
    showData=()=>{
      const {input1} = this.refs
      console.log(input1.value)
    }
    showData2=()=>{
      const {input2} = this.refs
      console.log(input2.value)
    }
    render(){
      return (
        <div>
          <input ref="input1" onClick={this.showData} type="text" placeholder="点击提示"/>
          <button onClick={this.showData}>点击</button>
          <input ref="input2" onBlur={this.showData2} type="text" placeholder="失去焦点提示"/>
        </div>
      )
    }
  }
  ReactDOM.render(<Demo/>,document.getElementById('test'))
</script>
|
回调函数形式的refs
内联的写法(开发常用)
在更新时,ref的回调会调用两次,但是其实并没有什么影响
 1
 2
 3
 4
 5
 6
 7
 8
 9
10
11
12
13
14
15
16
17
18
19
20
21
22
23
|
    <script>
        class Demo extends React.Component{
            showData=()=>{
                const {input1} = this
                console.log(input1.value);
            }
            showData2=()=>{
                const {input2} = this
                console.log(input2.value);
            }
            render() {
                return(
                    <div>
                    // 这里的回调函数会传一个参数,参数为dom节点,this执向实例,在实例中添加属性input1,值为它的dom节点
                        <input ref={c => this.input1 = c}  type="text"/>
                        <button onClick={this.showData}>点击</button>
                        <input ref={c => this.input2 = c} onBlur={this.showData2} type="text"/>
                    </div>
                )
            }
        }
        ReactDOM.render(<Demo/>,document.getElementById('test'))
    </script>
|
class绑定的函数形式
在更新时,ref的函数不会回调
 1
 2
 3
 4
 5
 6
 7
 8
 9
10
11
12
13
14
15
16
17
18
19
20
21
22
23
24
25
26
27
28
29
30
31
32
33
34
|
    <script>
        class Demo extends React.Component{

            state = {isHot:true}
            showData=()=>{
                const {input} = this
                console.log(input.value);
            }
            changeWeather=()=>{
                const {isHot} = this.state
                this.setState({isHot:!isHot})
            }
            //回调的函数
            saveInput=(c)=>{
                  //这里其实用onChange事件然后e.target也可以获取,然后存入state中,就是受控组件了
                this.input = c
                console.log('@',c)
            }
            render(){
                const {isHot} = this.state
                return (
                    <div>
                        <h2>今天天气{isHot?'炎热':'凉爽'}</h2>
                        // 这里更新时不会回调两次
                        <input type="text" ref={this.saveInput }/>
                        <button onClick={this.showData}>显示</button>
                        <button onClick={this.changeWeather}>改变天气</button>
                    </div>
                )
            }
        }

        ReactDOM.render(<Demo/>,document.getElementById('test'))
    </script>
|
createRef的使用
- React.createRef()创建容器,每个容器只能存放一个节点
- 通过this.容器名.current获得dom节点
 1
 2
 3
 4
 5
 6
 7
 8
 9
10
11
12
13
14
15
16
17
18
|
    <script>
        class Demo extends React.Component{
            myRef= React.createRef()
            show=()=>{
                console.log(this.myRef.current.value);
            }
            render(){
                return(
                    <div>
                        <input ref={this.myRef} type="text"/>
                        <button onClick={this.show}>按钮</button>
                    </div>
                )
            }
        }

        ReactDOM.render(<Demo/>,document.getElementById('test'))
    </script>
|
==注意==:
- 不能滥用ref,如果需要获取的dom节点上绑定了事件处理函数,那么可以从函数中获取event.target
 1
 2
 3
 4
 5
 6
 7
 8
 9
10
11
12
13
14
15
16
|
    <script>
        class Demo extends React.Component{
            show=(event)=>{
                console.log(event.target.value);
            }
            render(){
                return (
                    <div>
                        <input type="text" onBlur={this.show} placeholder='失去焦点提示'/>
                    </div>
                )
            }
        }

        ReactDOM.render(<Demo/>,document.getElementById('test')
    </script>
|
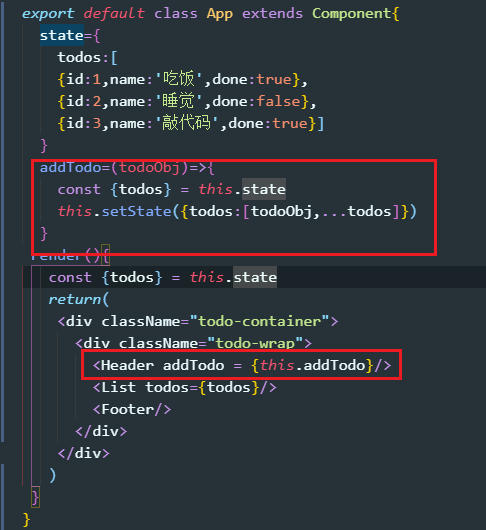
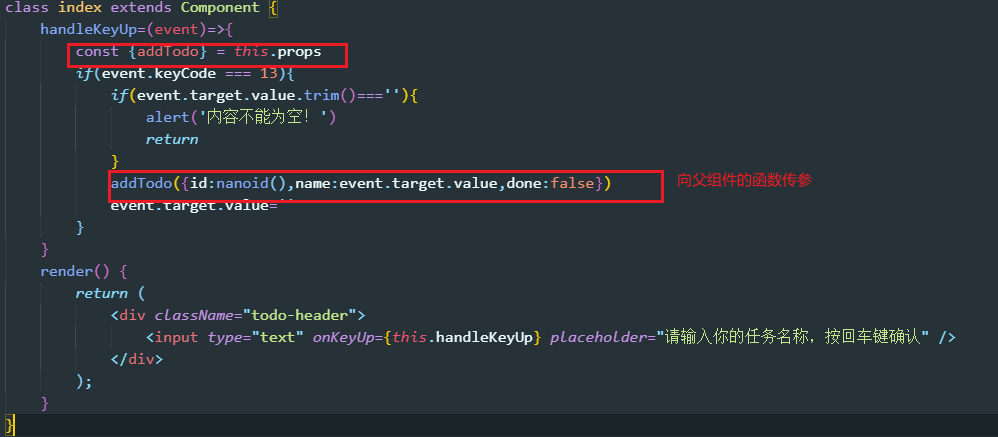
组件通信
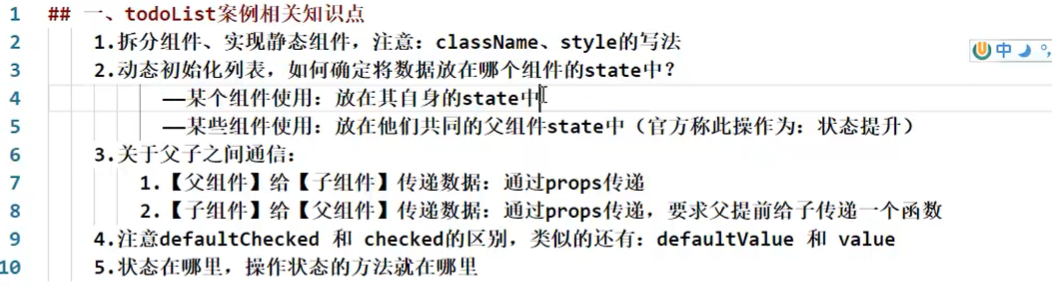
==注意==:状态在哪里,操作状态的方法就在哪里
父传子

子传父
-
父组件向子组件传递一个函数
-
子组件调用该函数并传参,父组件将该函数的参数保存到state中
爷孙传值
- 爷爷组件向父组件传递函数
- 父组件将函数继续传递给子组件
- 子组件调用函数,传参,爷爷组件通过参数接收值
兄弟传值
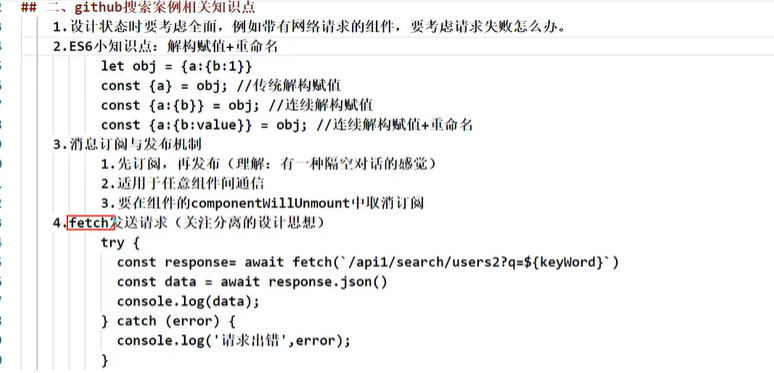
消息订阅-发布机制
-
工具库: PubSubJS
-
下载: npm install pubsub-js –save
-
使用:
-
import PubSub from ‘pubsub-js’ //引入
-
PubSub.subscribe(‘delete’, function(data){ }); //订阅
1
2
3
4
5
6
|
    componentDidMount() {
        //订阅消息
        PubSub.subscribe('changeState', (_, stateObj) => {
            this.setState(stateObj)
        })
    }
|
- PubSub.publish(‘delete’, data) //发布消息
 1
 2
 3
 4
 5
 6
 7
 8
 9
10
|
search = () => {
        const { input1: { value: keyword } } = this
        //发布消息
        PubSub.publish('changeState', { isFirst: false, isLoading: true })
        axios.get(`https://api.github.com/search/users?q=${keyword}`).then(res => {
            PubSub.publish('changeState', { isLoading: false,users:res.data.items })
        }).catch(err => {
            PubSub.publish('changeState', { err })
        })
    }
|
React中的构造器
- 第一个用处,通过this.state赋值对象来初始化内部state,但是一般直接在类中使用赋值语句
- 第二个用处,为事件绑定实例的this,但是一般用赋值语句+箭头函数解决
- 第三个用处,需要在constructor中获取props。所以,constructor基本不用,如果用了必须写super(props),且必须传props,不传就不能在构造器中使用this.props获取值
React中的事件绑定
- 驼峰命名
- {}中写函数名,不需要调用
- 可以将事件函数写在组件类中,通过赋值语句+箭头函数,箭头函数中的this指向实例,可以获取state中的值
 1
 2
 3
 4
 5
 6
 7
 8
 9
10
11
12
13
14
15
16
17
18
19
20
21
22
23
24
25
26
27
28
29
|
<script>
  class Weather extends React.Component{
    constructor(props) {
      super(props)
      this.state={isHot:false}
    }
      // 事件函数
    demo2=()=>{
        log
    }
    render(){
      console.log(this)
      const {isHot} = this.state

      return
        <div>
            // 绑定事件
        <h1 onClick={demo}>今天天气很{isHot?'炎热':'凉爽'}</h1>
        	// 绑定事件
        <h1 onClick={this.demo2}>今天天气很{isHot?'炎热':'凉爽'}</h1>
        </div>
    }
  }
  ReactDOM.render(<Weather/>,document.getElementById('test'))
  // 事件函数
  function demo() {
    console.log('标题被点击了')
  }
</script>
|
React中的事件处理
-
可以通过参数拿到当前的dom节点
 1
 2
 3
 4
 5
 6
 7
 8
 9
10
11
12
13
14
15
16
|
    <script>
        class Demo extends React.Component{
            show=(event)=>{
                console.log(event.target.value);
            }
            render(){
                return (
                    <div>
                        <input type="text" onBlur={this.show} placeholder='失去焦点提示'/>
                    </div>
                )
            }
        }

        ReactDOM.render(<Demo/>,document.getElementById('test'))
    </script>
|
非受控组件
- 表单中所有输入类的值是现用现取
 1
 2
 3
 4
 5
 6
 7
 8
 9
10
11
12
13
14
15
16
17
18
19
20
|
    <script>
        class Login extends React.Component{
            handleSubmit=(e)=>{
                e.preventDefault()
                const {username,password} = this
                console.log(username.value,password.value);
            }
            render() {
                return (
                    // 在点击提交时才获取到表单中的值
                    <form onSubmit={this.handleSubmit}>
                        用户名:<input ref={c=>this.username=c} type="text"/>
                        密码:<input ref={c=>this.password=c} type="text"/>
                        <button>提交</button>
                    </form>
                )
            }
        }
        ReactDOM.render(<Login/>,document.getElementById('test'))
    </script>
|
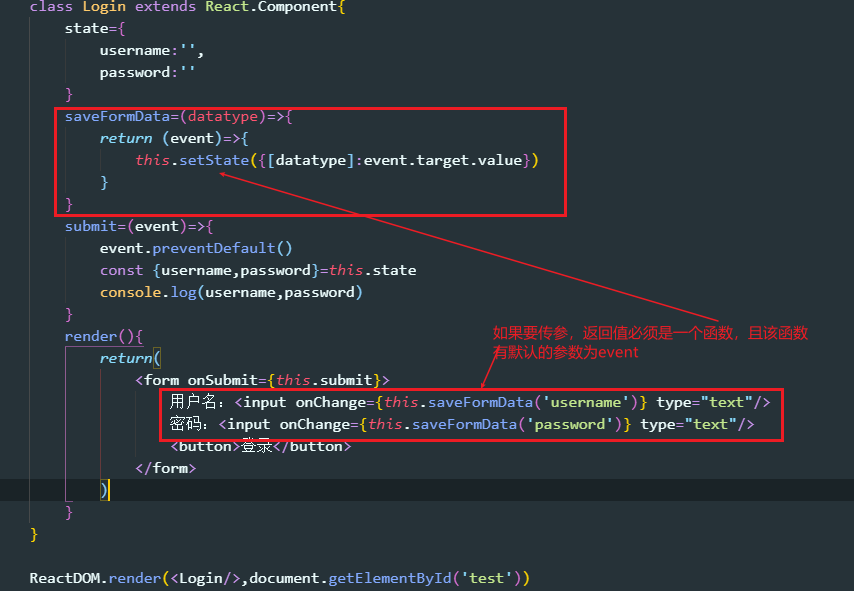
受控组件(推荐)
- 输入类的表单,在输入时就将值存入state中,等哪里需要使用时直接从state中去获取,相当于vue的双向数据绑定
- 可以避免ref的滥用
 1
 2
 3
 4
 5
 6
 7
 8
 9
10
11
12
13
14
15
16
17
18
19
20
21
22
23
24
25
26
27
28
29
30
31
32
33
|
    <script>
        class Login extends React.Component{
            state={
                username:'',
                password:''
            }
        // 将获取的数据保存到state中
            savePassword=(e)=>{
                this.setState({username:e.target.value})
            }
            saveUsername=(e)=>{
                this.setState({password:e.target.value})
            }
            submit=(e)=>{
                e.preventDefault()
                // 在需要使用时从state中去获取数据
                const {username,password} = this.state
                console.log(`用户名${username},密码${password}`);
            }
            render(){
                return (
                   <form onSubmit={this.submit}>
                    // 输入的数据通过当前的event.target获取
                        用户名:<input onChange={this.saveUsername} type="text"/>
                        密码:<input onChange={this.savePassword} type="text"/>
                        <button>登录</button>
                    </form>
                )
            }
        }

        ReactDOM.render(<Login/>,document.getElementById('test'))
    </script>
|
柯里化
生命周期
引出生命周期
 1
 2
 3
 4
 5
 6
 7
 8
 9
10
11
12
13
14
15
16
17
18
19
20
21
22
23
24
25
26
27
28
29
30
31
32
33
34
35
36
37
38
39
|
    <script>
        class Life extends React.Component{
            state={
                opacity:.5
            }
            // 卸载组件
            death=()=>{
                    ReactDOM.unmountComponentAtNode(document.getElementById('test'))
            }
            //挂载组件
            componentDidMount(){
                let {opacity} = this.state
                this.timer= setInterval(()=>{
                    opacity -= 0.1
                    if(opacity<=0){
                        opacity=1
                    }
                    this.setState({opacity})
                },200)
            }
            //卸载组件前
            componentWillUnmount(){
                clearInterval(this.timer)
            }
        	//初始化渲染,页面更新之后
            render(){

                const {opacity}  = this.state
                return (
                    <div>
                        <h1 style={{opacity}}>生命周期</h1>
                        <button onClick={this.death}>卸载组件</button>
                    </div>
                )
            }
        }

        ReactDOM.render(<Life/>,document.getElementById('test'))
    </script>
|
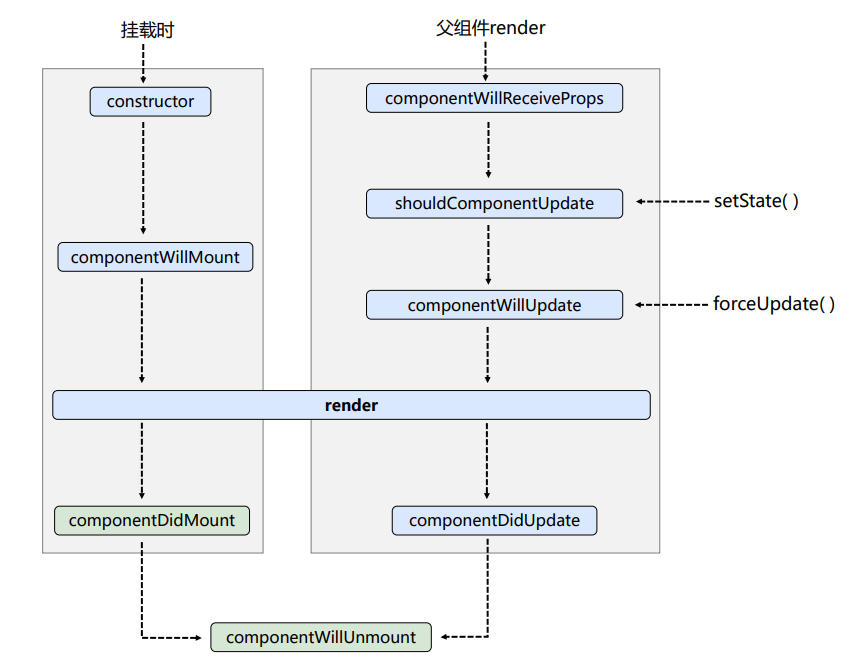
生命周期(旧)
- 初始化阶段:由ReactDOM.render()触发—-初次渲染
- constructor()
- componentWillMount()
- render()
- componentDIdMount()
- 一般做一些初始化的事,如:开启定时器,发送网络请求,订阅消息
- 更新阶段:由组件内部的this.setState()或父组件重新render()触发
- shouldComponentUpdate()
- componentWillUpdate()
- render()
- componentDidUpdate()
- 卸载组件:由ReactDOM.unmountComponentAtNode()触发
 1
 2
 3
 4
 5
 6
 7
 8
 9
10
11
12
13
14
15
16
17
18
19
20
21
22
23
24
25
26
27
28
29
30
31
32
33
34
35
36
37
38
39
40
41
42
43
44
45
46
47
48
49
50
51
52
53
54
55
56
57
58
59
60
61
62
63
64
65
|
    <script>
        class Life extends React.Component{
            //1 构造器
            constructor(props){
                super(props)
                console.log('Life---constructor');
                this.state={
                    count:0
                }
            }
            //2 挂载前
            componentWillMount(){
                console.log('Life---componentWillMount');
            }

            add=()=>{
                const {count} = this.state
                // 这里会走5-6-7
                this.setState({count:count+1})
            }
            update=()=>{
                // 这里会走6-7
                this.forceUpdate()
            }
            death=()=>{
                ReactDOM.unmountComponentAtNode(document.getElementById('test'))
            }
            //5 在setState后掉用,如果返回true则继续执行render,否则不更新页面,相当于一个阀门,用forceUpdate能直接绕过这个阀门
            shouldComponentUpdate(){
                console.log('Life---shouldComponentUpdate');
                return true
            }
            //6 将要更新
            componentWillUpdate(){
                console.log('Life---componentWillUpdate');
            }
            //3 初始化 7 更新
            render(){
                console.log('Life---render');
                const {count} = this.state
                return (
                    <div>
                        <h1>数字:{count}</h1>
                        <button onClick={this.add}>加1</button>
        			   <button onClick={this.update}>强制更新</button>
                        <button onClick={this.death}>卸载</button>
                    </div>
                )
            }
            //4 挂载完
            componentDidMount(){
                console.log('Life---componentDidMount');
            }
            //8 更新完
            componentDidUpdate(){
                console.log('Life---componentDidUpdate');
            }
            //9 卸载前
            componentWillUnmount(){
                console.log('Life---componentWillUnmount');
            }
        }

        ReactDOM.render(<Life/>,document.getElementById('test'))
    </script>
|
父组件的生命周期(旧)
 1
 2
 3
 4
 5
 6
 7
 8
 9
10
11
12
13
14
15
16
17
18
19
20
21
22
23
24
25
26
27
28
29
30
31
32
33
34
35
36
37
38
39
40
41
42
43
44
45
46
47
48
|
    <script>
        class Son extends React.Component{
            state={
                    carName:'奥迪'
                }
                changeCar=()=>{
                    this.setState({carName:'宝马'})
                }
            render(){
                const {carName} = this.state
                return(
                    <div>
                        <h1>Son</h1>
                        <button onClick={this.changeCar}>换车</button>
        			// 给父组件传属性
                        <Father carName={carName}/>
                    </div>
                )
            }
        }

        class Father extends React.Component{
            //接收newProps时调用,第一次发送来的属性不会调用该钩子
            componentWillReceiveProps(){
                console.log('componentWillReceiveProps');
            }
            shouldComponentUpdate(){
                console.log('shouldComponentUpdate');
                return true
            }
            componentWillUpdate(){
                console.log('componentWillUpdate');
            }
            render(){
                console.log('render');
                return(
                    <div>
                        <h1>Father:{this.props.carName}</h1>
                    </div>
                )
            }
            componentDidUpdate(){
                console.log('componentDidUpdate');
            }
        }

        ReactDOM.render(<Son/>,document.getElementById('test'))
    </script>
|
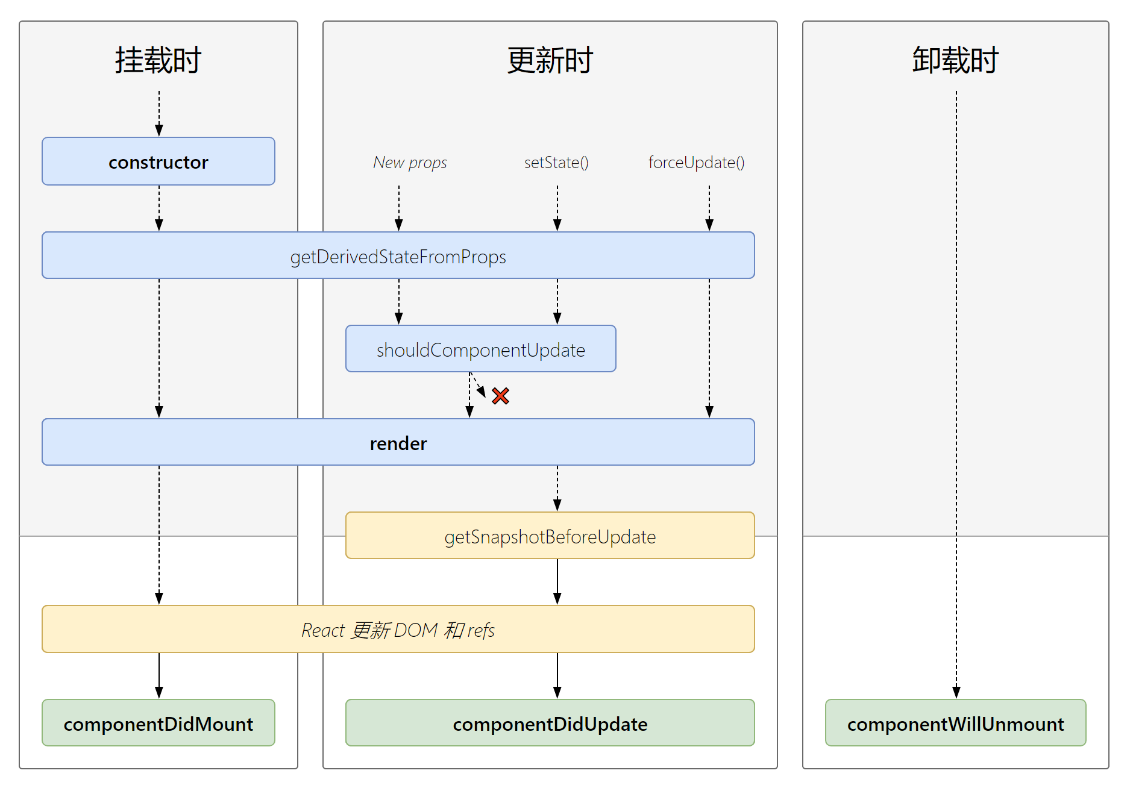
生命周期(新)
- 即将废弃3个will的生命周期钩子
- 增加两个get生命周期钩子
- getDerivedStateFormProps(props,state)
- props:传入的属性
- state:当前的state
- 如果state需要派生自props,则返回props
- ==注意==:派生的state将无法更新,所以在==state的值完全取决于props时才使用该钩子==,或者在构造器中将props给state也可以
- getSnapshotBeforeUpdate(preprops,prestate)
- preprops:传入新props之前的props
- prestate:更新之前的state
- 返回值为componentDidUpdate的第三个参数
 1
 2
 3
 4
 5
 6
 7
 8
 9
10
11
12
13
14
15
16
17
18
19
20
21
22
23
24
25
26
27
28
29
30
31
32
33
34
35
36
37
38
39
40
41
42
43
44
45
46
47
48
49
50
51
52
53
54
55
56
57
58
|
    <script>
        class Son extends React.Component{
            state={
                    carName:'奥迪'
                }
                changeCar=()=>{
                    this.setState({carName:'宝马'})
                }
            render(){
                const {carName} = this.state
                return(
                    <div>
                        <h1>Son</h1>
                        <button onClick={this.changeCar}>换车</button>
                        <Father carName={carName}/>
                    </div>
                )
            }
        }

        class Father extends React.Component{
            state={
                name:'xj'
            }
        //getDerivedStateFromProps是一个静态函数,也就是这个函数不能通过this访问到class的属性,也并不推荐直接访问属性。而是应该通过参数提供的Props以及prevState来进行判断,根据新传入的props来映射到state。需要注意的是,如果props传入的内容不需要影响到你的state,那么就需要返回一个null,这个返回值是必须的,所以尽量将其写到函数的末尾。

            static getDerivedStateFromProps(props,state){
                console.log('getDerivedStateFromProps',props,state);
                return null
            }

            shouldComponentUpdate(){
                console.log('shouldComponentUpdate');
                return true
            }
            /* 在最近一次渲染输出(提交到DOM节点)之前调用。
             它使得组件能在发生更改之前从DOM中捕获一些信息,比如列表的高度等。
            此生命周期的任何返回值将作为第三个参数传递给componentDidUpdate()*/
            getSnapshotBeforeUpdate(preProps,preState){
                console.log('getSnapshotBeforeUpdate',preProps,preState);
                return 'xqz'
            }
            render(){
                console.log('render');
                return(
                    <div>
                        <h1>Father:{this.props.carName}</h1>
                    </div>
                )
            }
            componentDidUpdate(preProps,preState,snapshotValue){
                console.log(preProps,preState,snapshotValue);
                console.log('componentDidUpdate');
            }
        }

        ReactDOM.render(<Son/>,document.getElementById('test'))
    </script>
|
getSnapshotBeforeUpdate的应用
实现不断增加列表高度,但是不影响当前的浏览
 1
 2
 3
 4
 5
 6
 7
 8
 9
10
11
12
13
14
15
16
17
18
19
20
21
22
23
24
25
26
27
28
29
30
31
32
33
34
35
36
37
38
|
    <script>
        class NewsList extends React.Component{
            state={
                newsList:[]
            }
            componentDidMount(){
                setInterval(()=>{
                    const {newsList}=this.state
                    console.log(newsList);
                    const news = '新闻'+(newsList.length+1)
                    console.log(news);
                    this.setState({newList:newsList.unshift(news)})
                },500)
            }
        //返回每次更新前的list内容高度
            getSnapshotBeforeUpdate(){
                return this.list.scrollHeight
            }
            render(){
                const {newsList}= this.state
                return (
                    <div className="list" ref={c=>this.list=c}>
                        <ul>
                            {newsList.map((v,i)=>{
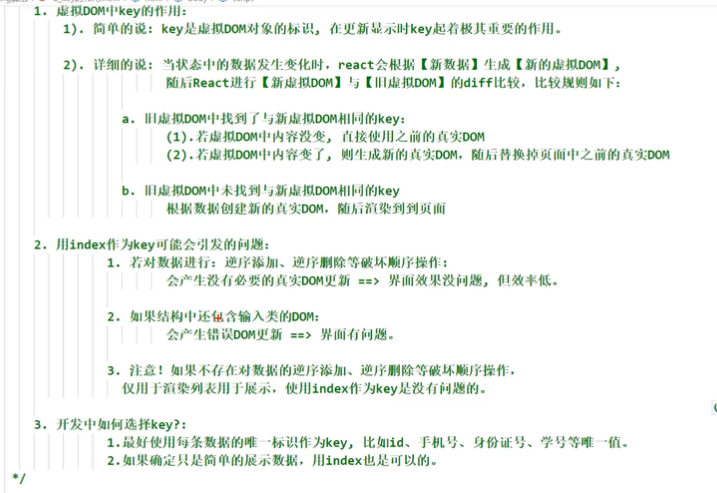
                                return <li key={i}>{v}</li>
                            })}
                        </ul>
                    </div>
                )
            }
            componentDidUpdate(prePorps,preState,snapshotValue){
                // 滚动的高度=已经滚动的高度+(目前的高度-更新前的高度)
                this.list.scrollTop += this.list.scrollHeight-snapshotValue
            }
        }

        ReactDOM.render(<NewsList/>,document.getElementById('test'))
    </script>
|
DOM的diffing算法
React脚手架
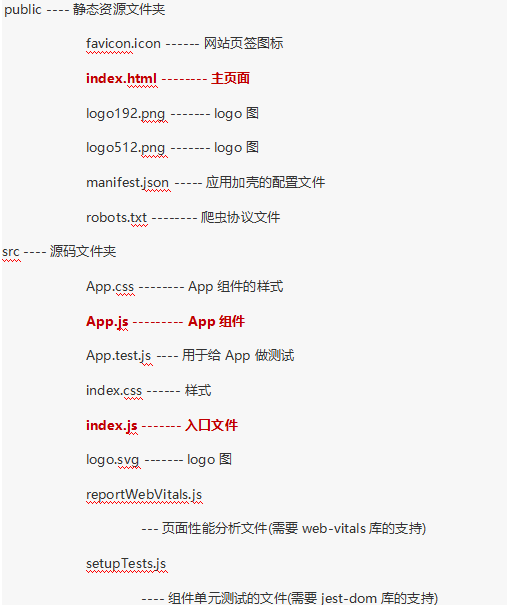
项目结构
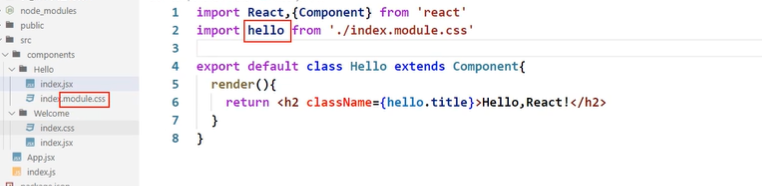
开发流程
-
在src目录下新建文件夹定义组件并暴露
// React为默认暴露,Component为分别暴露
import React,{Component} from ‘react’
import ‘./Hello.css’
export default class Hello extends Component{
render(){
return(
Hello,React!
)
}
}
 1
 2
 3
 4
 5
 6
 7
 8
 9
10
11
12
13
14
15
16
17
18
|
2. 在App.js中引入使用并暴露

```javascript
//创建外壳组件
import React,{Component} from 'react'
import Hello from './components/Hello/Hello'
import Welcome from './components/Welcome/Welcome'
export default class App extends Component{
 render(){
   return(
     <div>
        <Hello/>
        <Welcome/>
     </div>
   )
 }
}
|
-
在index.js中引入App,render到root跟组件
 1
 2
 3
 4
 5
 6
 7
 8
 9
10
11
12
13
14
15
16
17
18
|
//引入react核心库
import React from 'react';
//引入reactDOM
import ReactDOM from 'react-dom';
//引入App组件
import App from './App';
//用于测试性能
import reportWebVitals from './reportWebVitals';

//渲染App到页面
ReactDOM.render(
  <React.StrictMode>
    <App />
  </React.StrictMode>,
  document.getElementById('root')
);

reportWebVitals();
|
样式的模块化
todolist案例
github搜索案例
配置代理解决跨域
方法一
在package.json中追加如下配置
1
|
"proxy":"http://localhost:5000"
|
说明:
- 优点:配置简单,前端请求资源时可以不加任何前缀。
- 缺点:不能配置多个代理。
- 工作方式:上述方式配置代理,当请求了3000不存在的资源时,那么该请求会转发给5000 (优先匹配前端资源)
方法二
-
第一步:创建代理配置文件
1
|
在src下创建配置文件:src/setupProxy.js
|
-
编写setupProxy.js配置具体代理规则:
 1
 2
 3
 4
 5
 6
 7
 8
 9
10
11
12
13
14
15
16
17
18
19
20
21
|
const {createProxyMiddleware } = require('http-proxy-middleware')

module.exports = function(app) {
  app.use(
    createProxyMiddleware ('/api1', {  //api1是需要转发的请求(所有带有/api1前缀的请求都会转发给5000)
      target: 'http://localhost:5000', //配置转发目标地址(能返回数据的服务器地址)
      changeOrigin: true, //控制服务器接收到的请求头中host字段的值
      /*
      	changeOrigin设置为true时,服务器收到的请求头中的host为:localhost:5000
      	changeOrigin设置为false时,服务器收到的请求头中的host为:localhost:3000
      	changeOrigin默认值为false,但我们一般将changeOrigin值设为true
      */
      pathRewrite: {'^/api1': ''} //去除请求前缀,保证交给后台服务器的是正常请求地址(必须配置)
    }),
    createProxyMiddleware ('/api2', {
      target: 'http://localhost:5001',
      changeOrigin: true,
      pathRewrite: {'^/api2': ''}
    })
  )
}
|
说明:
- 优点:可以配置多个代理,可以灵活的控制请求是否走代理。
- 缺点:配置繁琐,前端请求资源时必须加前缀。
React路由
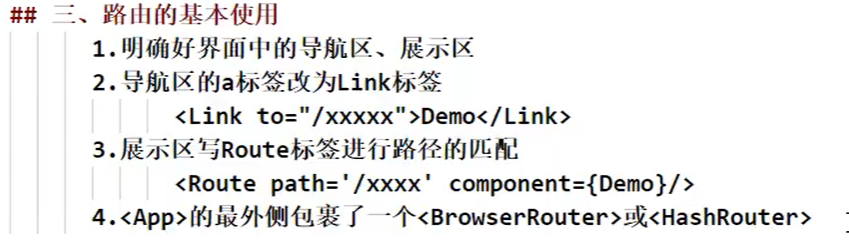
react-router-dom基本使用
-
npm install react-router-dom –save
-
在index.js中引入BrowserRouter组件(histroy模式),将App组件包裹,即整个应用使用一个路由器
 1
 2
 3
 4
 5
 6
 7
 8
 9
10
|
import React from 'react'
import ReactDOM from 'react-dom'
import {BrowserRouter} from 'react-router-dom'
import App from './App'

ReactDOM.render(
    <BrowserRouter>
        <App/>
    </BrowserRouter>
    ,document.getElementById('root'))
|
-
在父组件中添加路由链接Link
-
在父组件中注册路由Route
- path:对应的路由链接
- component:对应渲染的组件
 1
 2
 3
 4
 5
 6
 7
 8
 9
10
11
12
13
14
15
16
17
18
19
20
21
22
23
24
25
26
27
28
29
30
31
32
33
34
35
36
37
|
import React, { Component } from 'react';
import {Link,Route} from 'react-router-dom'
import About from './components/About'
import Home from './components/Home'
class App extends Component {
    render() {
        return (
            <div>
            <div className="row">
              <div className="col-xs-offset-2 col-xs-8">
                <div className="page-header"><h2>React Router Demo</h2></div>
              </div>
            </div>
            <div className="row">
              <div className="col-xs-2 col-xs-offset-2">
                <div className="list-group">
                // 路由链接
                  <Link className="list-group-item active" to="/about">About</Link>
                  <Link className="list-group-item" to="/home">Home</Link>
                </div>
              </div>
              <div className="col-xs-6">
                <div className="panel">
                  <div className="panel-body">
                  //注册路由
                    <Route path='/about' component={About}></Route>
                    <Route path='/home' component={Home}></Route>
                  </div>
                </div>
              </div>
            </div>
          </div>
        );
    }
}

export default App;
|
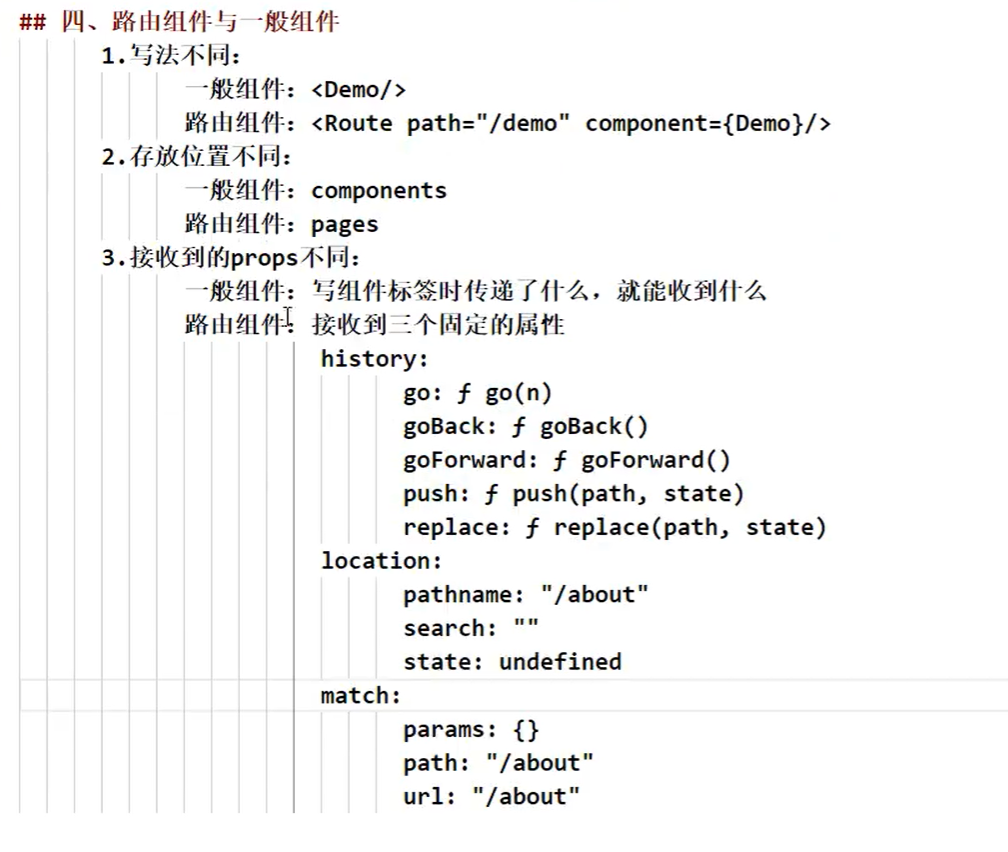
路由组件与一般组件
==注意==:
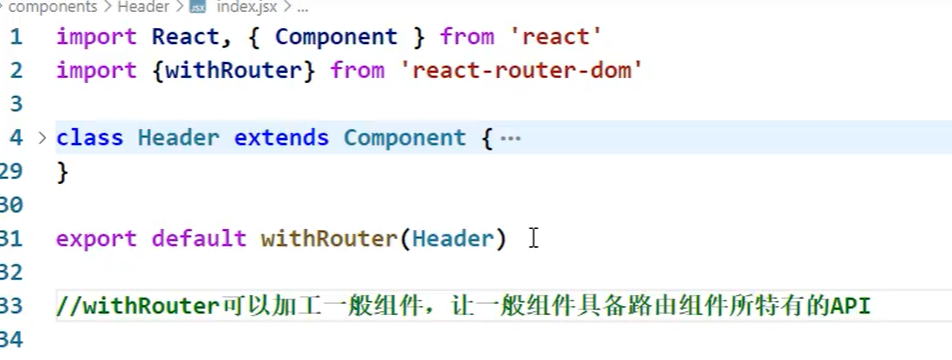
- 只有路由组件才有histroy
withRouter函数
NavLink的使用
- 默认的activeClassName为active
- 点击后会自动添加activeClassName
NavLink的二次封装
 1
 2
 3
 4
 5
 6
 7
 8
 9
10
11
|
import React, { Component } from 'react';
import { NavLink } from 'react-router-dom'
class MyNavLink extends Component {
    render() {
        return (
            <NavLink className="list-group-item" {...this.props} /> //扩展运算符将key和value都展开,包括children,值就是标签体内容
        )
    }
}

export default MyNavLink;
|
使用
1
|
<MyNavLink to='/home'>Home</MyNavLink> //这里标签体的内容会自动整理为标签的一个属性,key为children
|
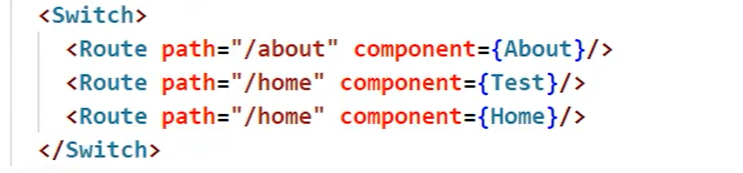
switch的使用
- 不用switch组件,会依次匹配路由,效率低下
- switch组件中,匹配到了路由后就不会再向下匹配了
- 注意:相同路径匹配第一个,不用switch会全部显示
解决样式丢失
一般在路由前加上项目或者公司名,刷新后请求资源的路径变了导致请求不到css文件
-
将<link rel=“stylesheet” href="./js/bootstrap.css">中的./改为/
1
|
<link rel="stylesheet" href="/js/bootstrap.css"> //不带.是指通过localhost端口号相对地址访问
|
-
改为
1
|
<link rel="stylesheet" href="%PUBLIC_URL%/js/bootstrap.css"> //绝对路径
|
-
将browserrouter改为hashrouter,因为#后面的不会加入请求地址中,但是不常用
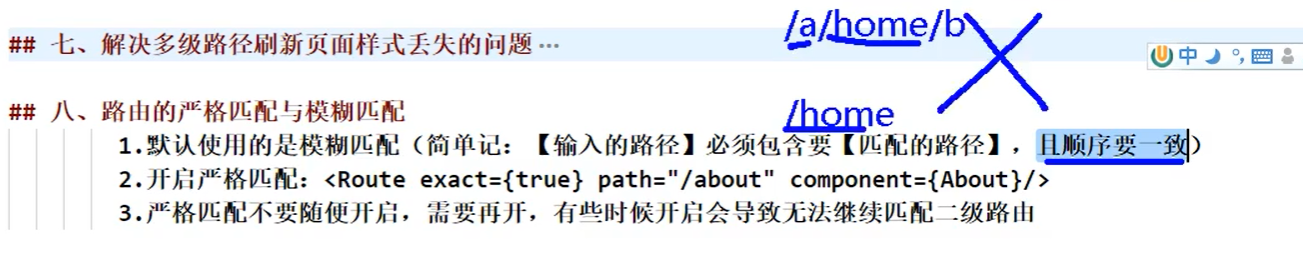
路由的严格匹配与模糊匹配
Redirect组件的使用
1
2
3
4
5
6
|
                  //注册路由
                  <Switch>
                    <Route exact path='/test/about' component={About}></Route>
                    <Route path='/test/home' component={Home}></Route>
                    <Redirect to='/test/about'/> // 匹配不到时跳转
                  </Switch>
|
嵌套路由
 1
 2
 3
 4
 5
 6
 7
 8
 9
10
11
12
13
14
15
16
17
18
19
20
21
22
23
24
25
26
27
28
29
30
31
32
|
import React, { Component } from 'react';
import { Route ,Redirect} from 'react-router-dom'
import MyNavLink from '../../components/MyNavLink'
import News from './News'
import Message from './Message'
class index extends Component {
    render() {
        return (
            <div>
                <h2>Home组件内容</h2>
                <div>
                    <ul class="nav nav-tabs">
                        <li>
                            <MyNavLink to='/test/home/news'>News</MyNavLink>
                        </li>
                        <li>
                            <MyNavLink to='/test/home/message'>message</MyNavLink>
                        </li>
                    </ul>
                    <div>
                        {/* 注册路由 二级路由 一级路由为/test/home*/}
                        <Route path='/test/home/news' component={News}/>
                        <Route path='/test/home/message' component={Message}></Route>
                        <Redirect to='/test/home/news'/>
                    </div>
                </div>
            </div>
        );
    }
}

export default index;
|
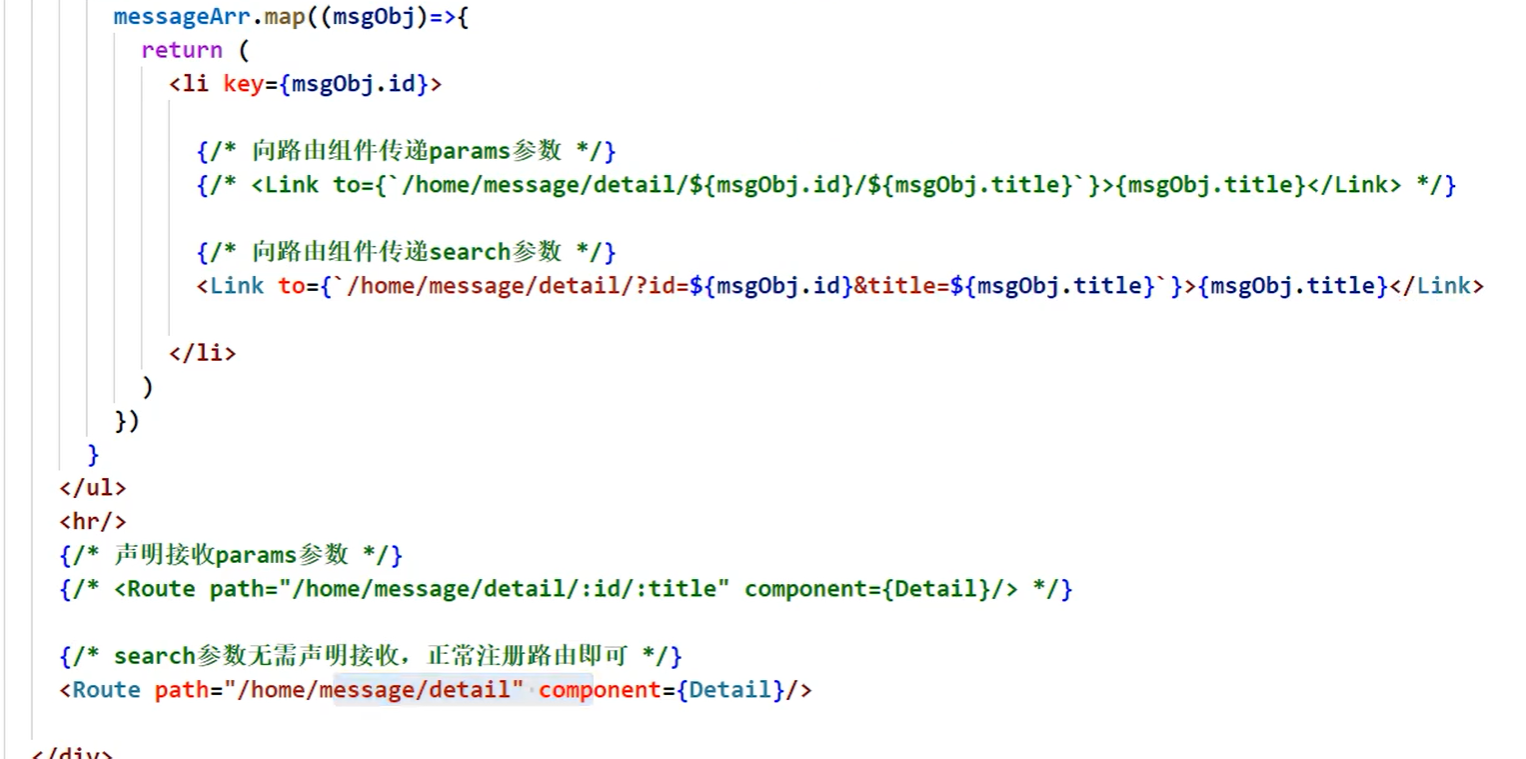
路由传参
传递–>声名接收–>接收
params参数
 1
 2
 3
 4
 5
 6
 7
 8
 9
10
11
12
13
14
15
16
17
18
19
20
21
22
23
24
25
26
27
28
|
import React, { Component } from 'react';
import { Link, Route } from 'react-router-dom'
import Detail from './Detail'
const messageArr = [
    { id: 1, title: '消息1' },
    { id: 2, title: '消息2' },
    { id: 3, title: '消息3' },
]
class Message extends Component {
    render() {
        return (
            <div>
                <ul>
                    {messageArr.map((v, i) => {
                        return <li key={v.id}>
                           //传递参数
                            <Link to={`/test/home/message/detail/${v.id}/${v.title}`}>{v.title}</Link>
                        </li>
                    })}
                </ul>
                // 声名接收参数
                <Route path={`/test/home/message/detail/:id/:title`} component={Detail} />
            </div>
        );
    }
}

export default Message;
|
 1
 2
 3
 4
 5
 6
 7
 8
 9
10
11
12
13
14
15
16
17
18
19
20
21
22
23
24
25
26
27
|
import React, { Component } from 'react';
const contentArr =[
    {id:1,content:'内容1'},
    {id:2,content:'内容2'},
    {id:3,content:'内容3'}
]
class Detail extends Component {
    render() {
        // 接收参数
        const params = this.props.match.params
        const result = contentArr.find(v=>{
            return v.id==params.id
        })
        console.log(result);
        return (
            <div>
                <ul>
                    <li>ID:{params.id}</li>
                    <li>Title:{params.title}</li>
                    <li>Content:{result.content}</li>
                </ul>
            </div>
        );
    }
}

export default Detail;
|
search参数
接收参数使用querystring模块
 1
 2
 3
 4
 5
 6
 7
 8
 9
10
11
12
13
14
15
16
17
18
19
20
21
22
23
24
25
26
27
|
import React, { Component } from 'react';
import qs from 'querystring'//引入模块,stringlify把对象变成urlencoded编码,parse把urlencoded编码变成对象
const contentArr =[
    {id:1,content:'内容1'},
    {id:2,content:'内容2'},
    {id:3,content:'内容3'}
]
class Detail extends Component {
    render() {
        const {search} = this.props.location
        const result = qs.parse(search.slice(1))
        const {content} = contentArr.find(v=>{
            return v.id==result.id
        })
        return (
            <div>
                <ul>
                    <li>ID:{result.id}</li>
                    <li>Title:{result.title}</li>
                    <li>Content:{content}</li>
                </ul>
            </div>
        );
    }
}

export default Detail;
|
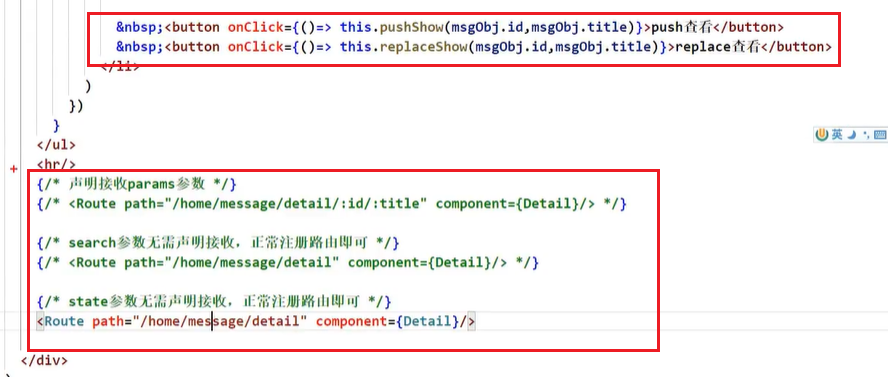
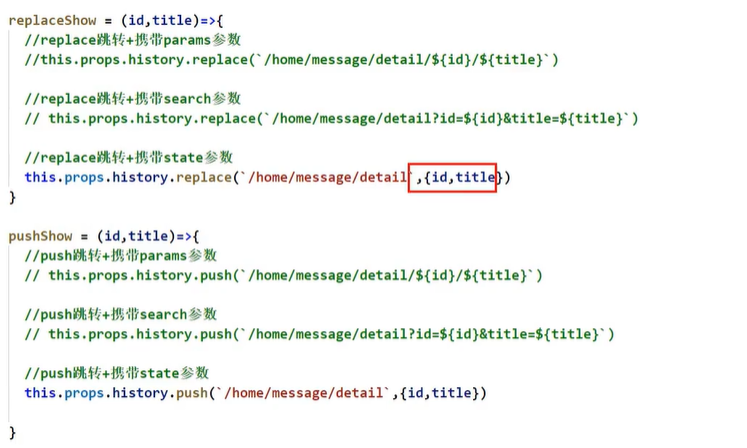
state参数
 1
 2
 3
 4
 5
 6
 7
 8
 9
10
11
12
13
14
15
16
17
18
19
20
21
22
23
24
25
26
27
|
import React, { Component } from 'react'
import qs from 'querystring'
const contentArr =[
    {id:1,content:'内容1'},
    {id:2,content:'内容2'},
    {id:3,content:'内容3'}
]
class Detail extends Component {
    render() {
        const state = this.props.location.state || {} //刷新是可以保留参数的,因为是history模式,location是histroy的一个属性,防止清除缓存后报错

        const {content} = contentArr.find(v=>{
            return v.id==state.id
        }) || {} //同理
        return (
            <div>
                <ul>
                    <li>ID:{state.id}</li>
                    <li>Title:{state.title}</li>
                    <li>Content:{content}</li>
                </ul>
            </div>
        );
    }
}

export default Detail;
|
区别
- state的参数看不到,params和search参数可以在地址上看到
- params参数需要声名接收,其他两个不需要
- search参数在接收时需要querystring模块进行解析
- 三种方法传递的写法都不同,但是都可以写成对象
push与replace
- push有历史记录
- 在link标签加上replace属性,就没有历史记录
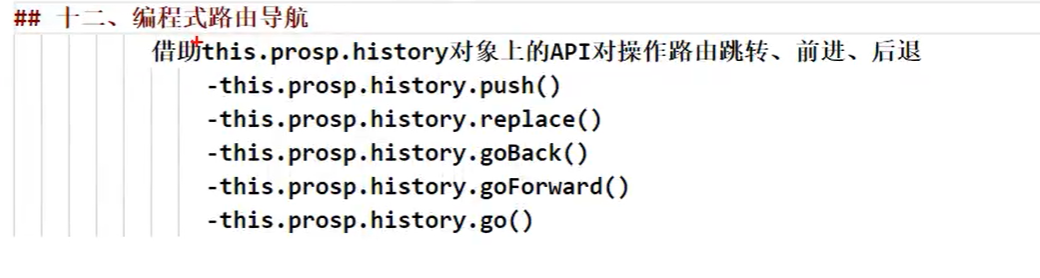
编程式路由导航
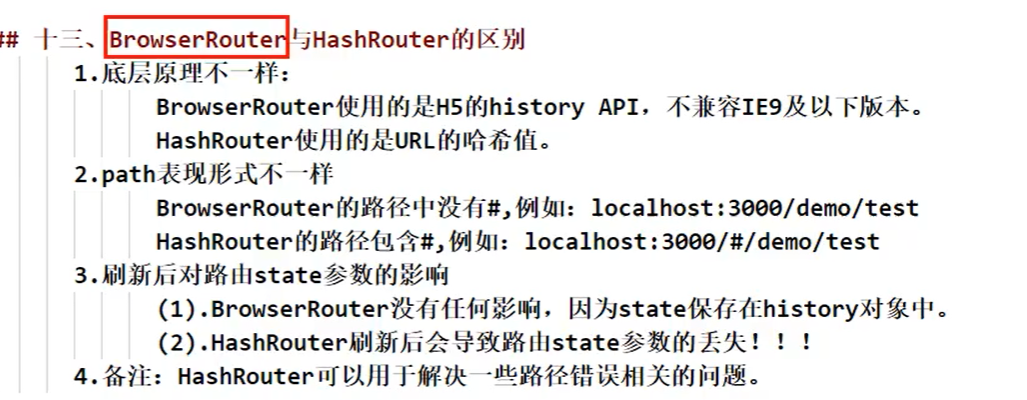
BrowserRouter与HashRouter的区别
Redux
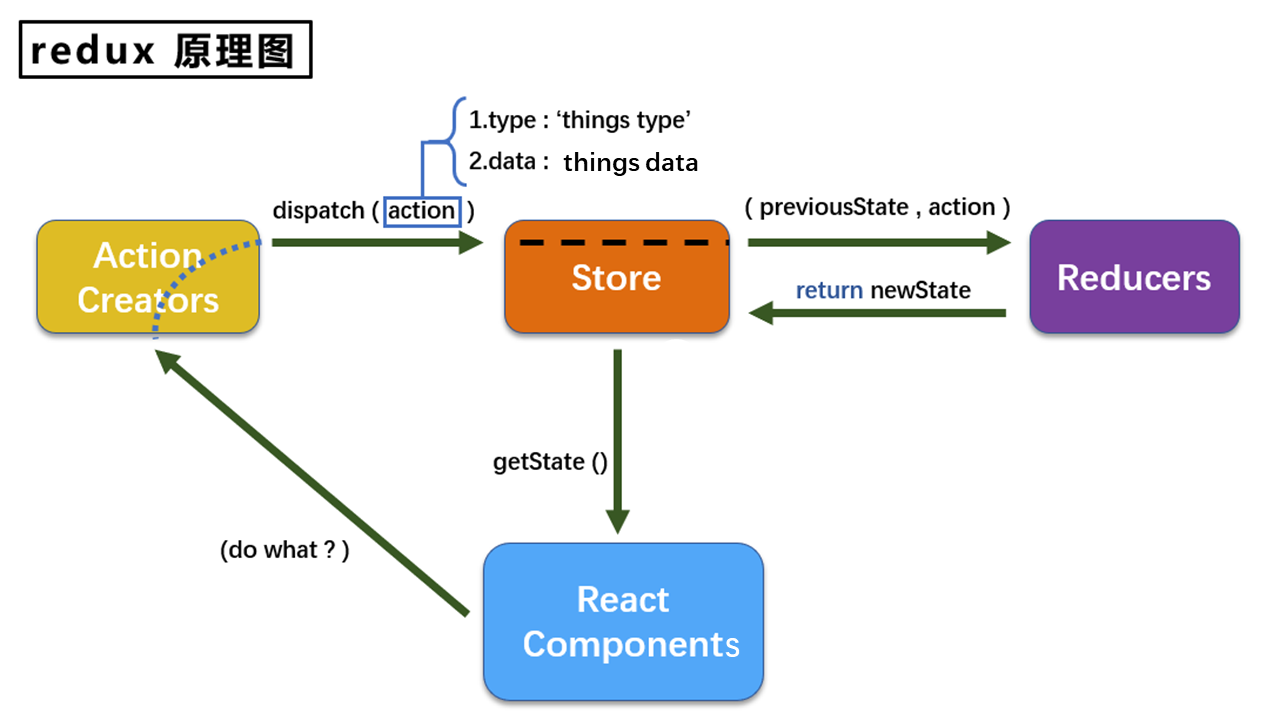
流程
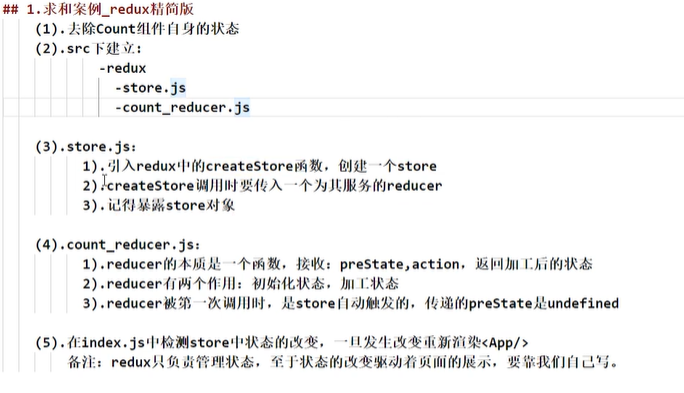
- 首先createStore去创建一个store,传入一个为其服务的reducer,并暴露
- reducer是函数,接收prestate和action,action为对象,有type和data,返回加工后的状态
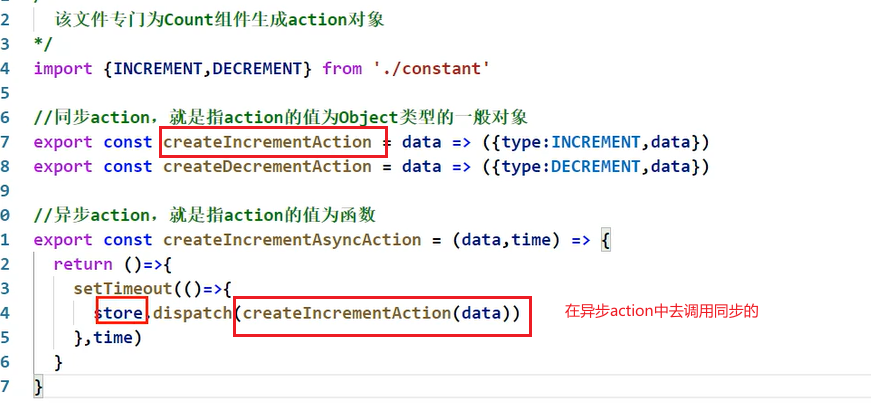
- 需要一个文件作为actioncreator,用于返回action对象
- 然后调用store实例的dispatch方法,让为这个store服务的reducer进行加工数据后返回
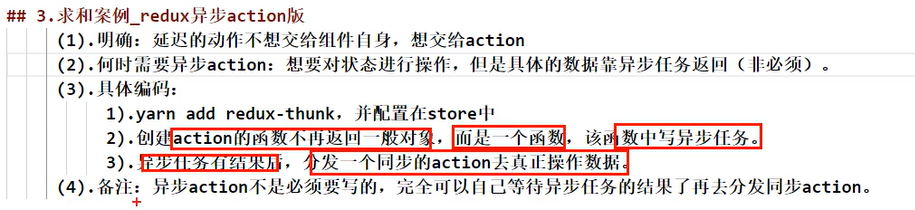
异步action
返回的是一个函数
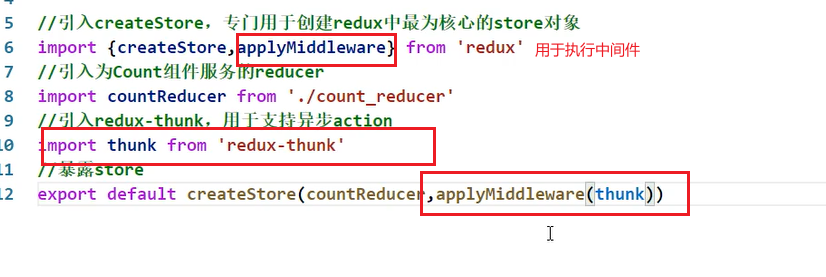
此时会报错,因为dispatch中需要一个action对象,而不是一个函数,
需要redux-thunk
redux-thunk
react-redux
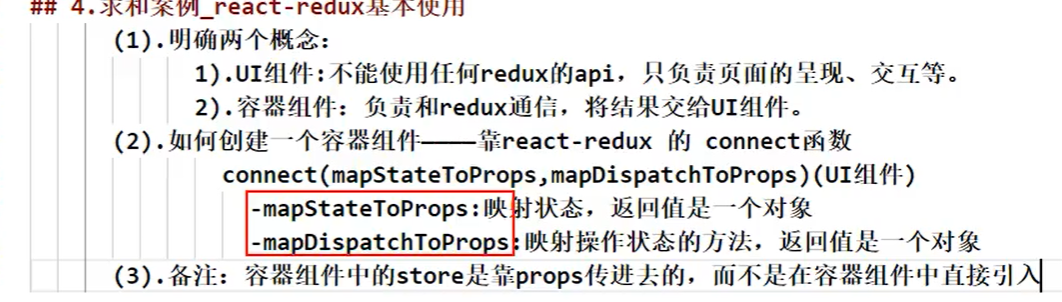
React-redux的基本使用
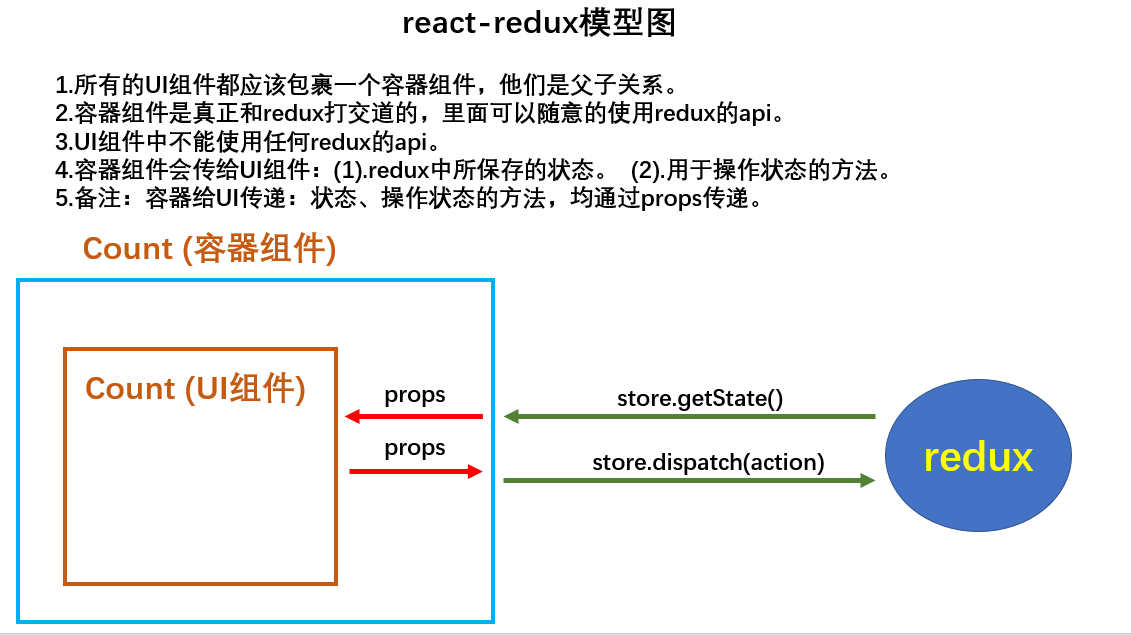
容器中连接store和ui组件
==注意==:在APP.jsx中,直接使用容器组件,并通过props的方式传递store
ui组件中使用
流程总结:
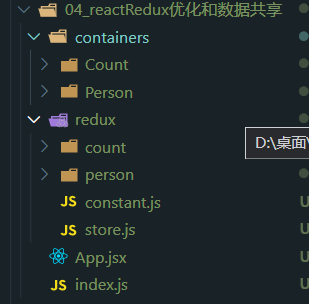
- 首先redux需要,constant,action,reducer,store文件;一个component需要一个container文件
- container用于连接component和store,store通过属性传递,component文件引入
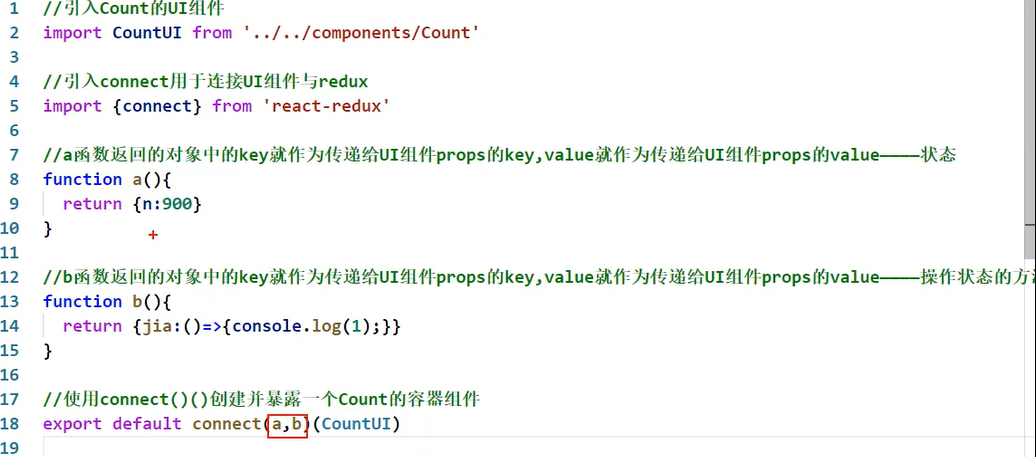
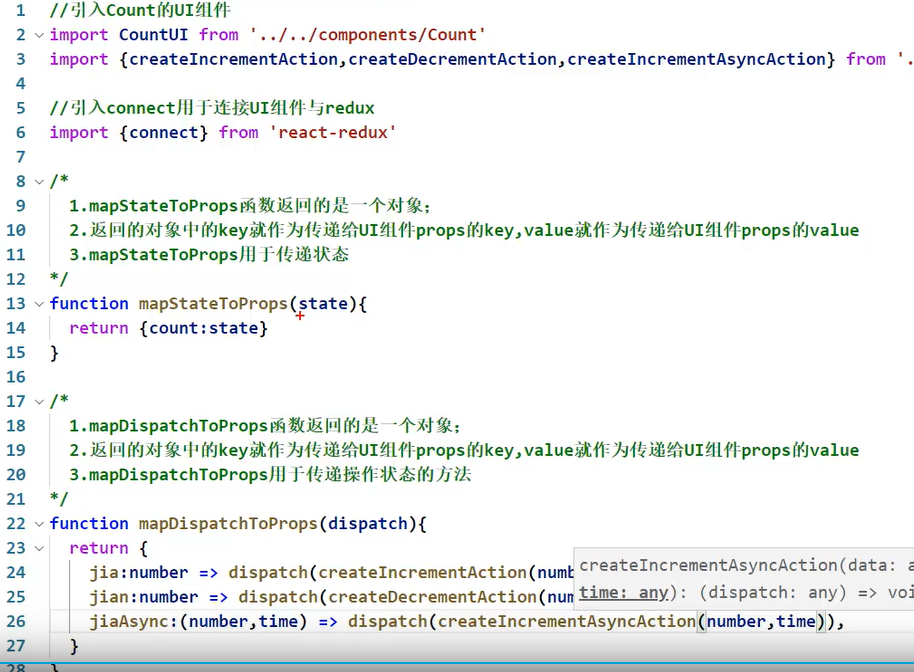
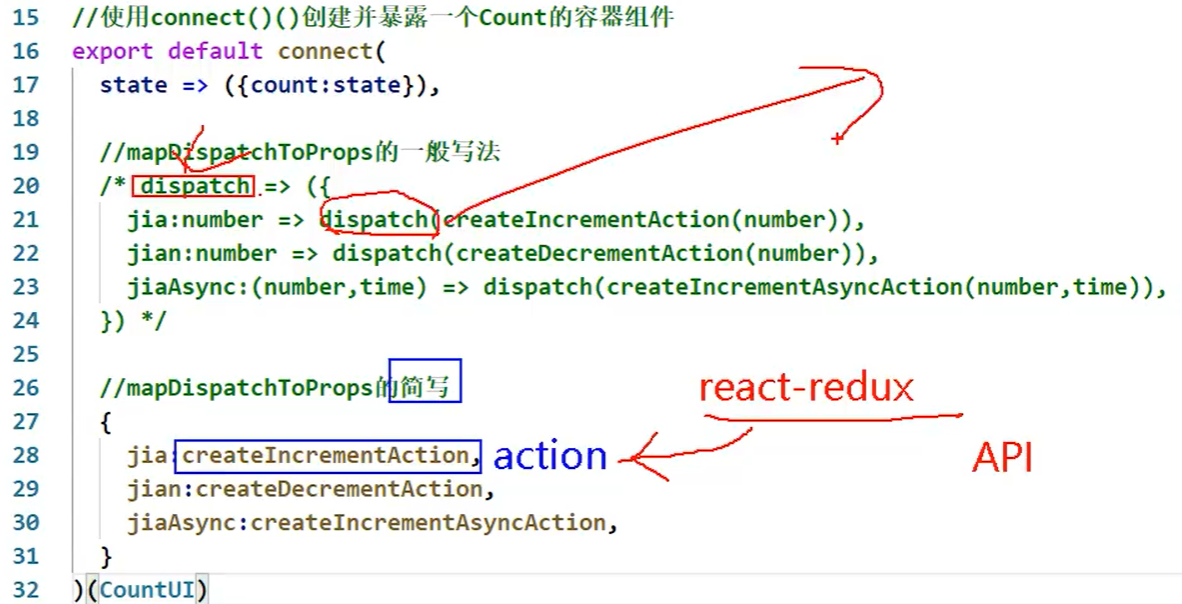
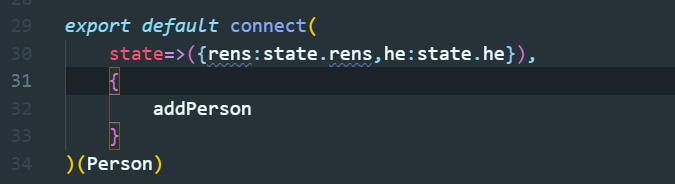
- react-redux中有connect函数,将ui和store连接,第一个参数mapStateToProps(一个function)返回state,第二个mapDispatchToPsops返回操作state的方法dispatch,返回类型都是对象,相当于返回到props中了
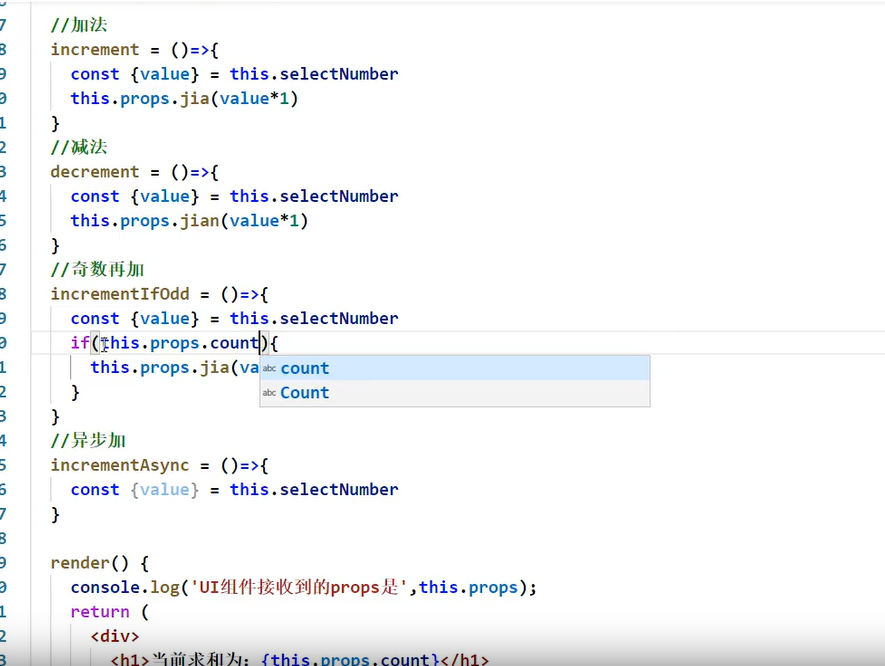
- component通过属性(来自connect绑定的constainer)调用store中的state或者方法
- 因为dispatch中需要一个action对象,所以到达action文件进行创建,然后dispatch执行,调用action的type在reducer中对应的操作
- action和reducer中使用constant文件
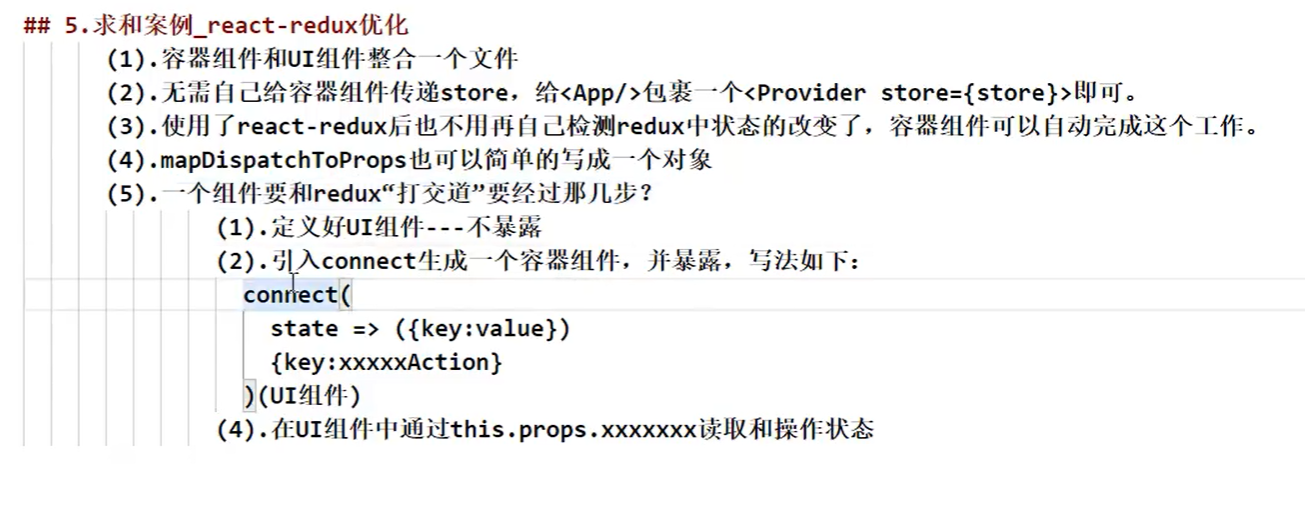
优化
1.react-redux的dispatch可以写成对象的简写形式
- component中调用了jia后,相当于调用action中的increment方法,参数通过increment传递
- 然后react-redux会自动帮我们分发dispatch
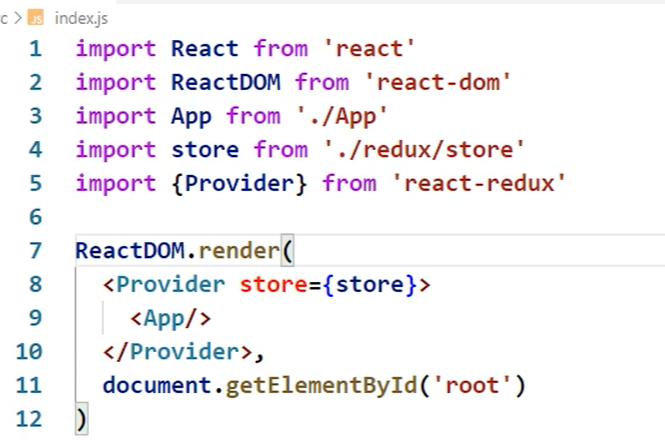
2.使用react-redux不用监听storer的变化
3.provider组件包裹APP可以将所有的容器组件都拥有store
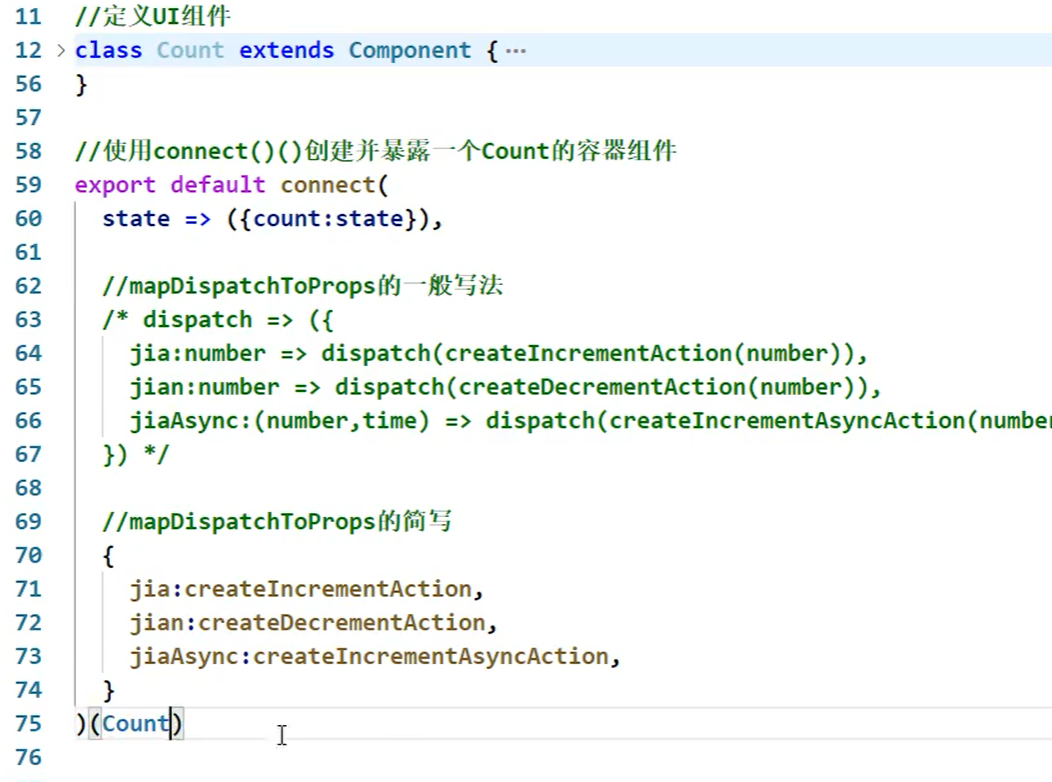
4.整合ui组件与容器组件
将ui组件的定义写在容器组件中
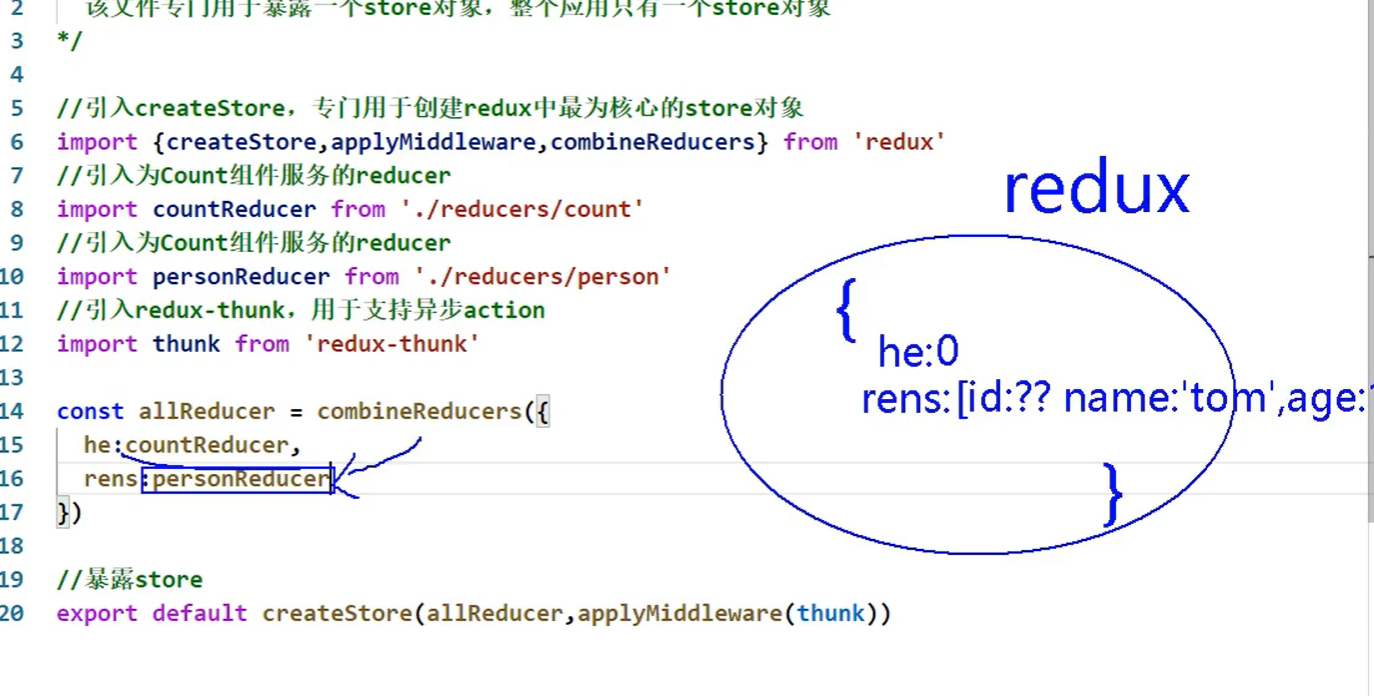
数据共享
combineReducers中的对象就是redux的store中最终保存的数据结构
==流程==
-
首先将redux中分文件夹建立action和reducer
-
在strore中将reducers整合
-
在使用时获取需要的state
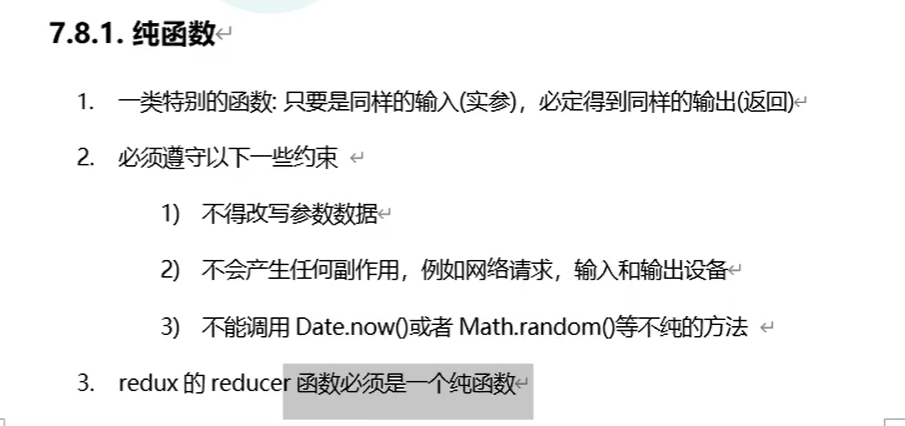
纯函数
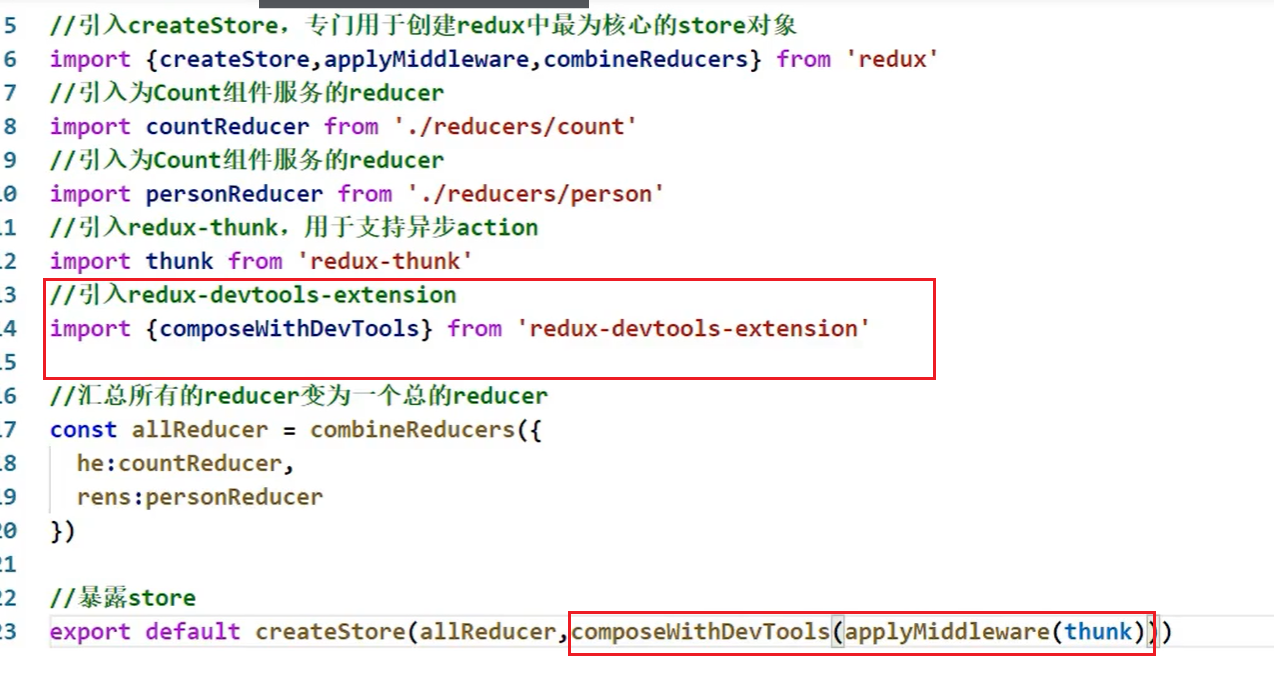
redux开发者工具
npm i redux-devtools-extension
常用库
nanoid
生成唯一的uuid
- npm install nanoid –save
- import {nanoid} from ’nanoid’
- nanoid()函数的返回值是唯一的uuid
pubsub-js
兄弟组件通信
- npm install pubsub-js –save
- import PubSub from ‘pubsub-js’ //引入
- PubSub.subscribe(‘delete’, function(data){ }); //订阅
- PubSub.publish(‘delete’, data) //发布消息
antd
npm install antd –save
按需引入
- npm install react-app-rewired customize-cra babel-plugin-import –save
 1
 2
 3
 4
 5
 6
 7
 8
 9
10
|
const {override, fixBabelImports} = require('customize-cra')

module.exports = override(
  // 根据import(使用babel-plugin-import包)实现按需引入样式
  fixBabelImports('import', {
    libraryName: 'antd',
    libraryDirectory: 'es',
    style: 'css',
  })
)
|
看文档
store
用于在localstorage中进行存储,解决浏览器兼容性问题
react-router-dom
路由组件
redux
状态化管理
redux-thunk
异步action
react-redux
连接ui组件与redux
项目相关
登录状态保持和权限验证
- 登录成功将用户信息存入localstorage,并通过reducer更新redux中的store,用了react-redux后一旦store更新,组件也会更新
- 在以及路由组件的render中判断如果store中用户存在,直接跳转至相应页面,否则Redirect至登录